Pinterest Masonry Layout (Staggered Grid)

If you have used the Pinterest app or their website, you would have noticed a rather creative grid layout. That is a Masonry Layout.
It works by placing elements in optimal position based on available vertical space, sort of like a mason fitting stones in a wall.
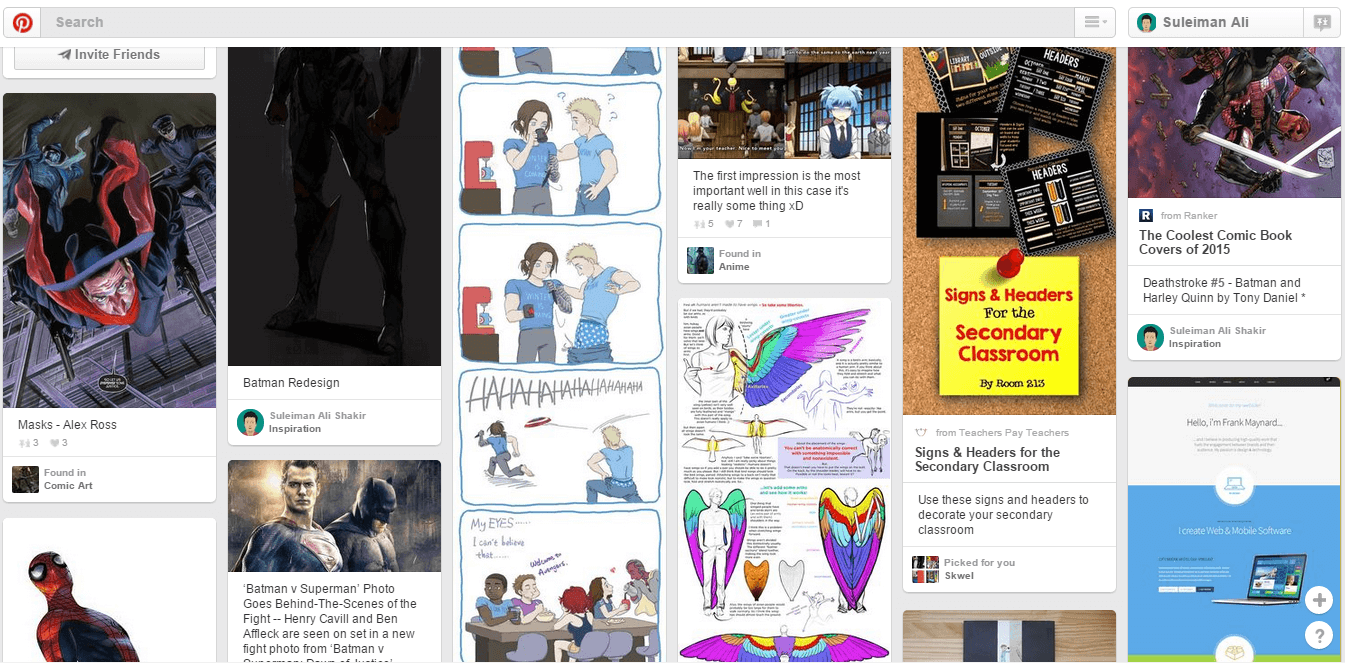
My Pinterest home feed
Thankfully, we won’t be needing any external library for this as Android’s native RecyclerView makes implementing a Pinterest masonry layout simply by changing the RecyclerView’s Layout Manager.
This is quite popular in web design as well. Let’s look at implementing this in Android.
Start by adding the require Gradle dependencies.
dependencies {
    compile 'com.android.support:appcompat-v7:22.2.1'
    compile 'com.android.support:recyclerview-v7:22.2.1'
}
Masonry Layout – Tile
Now for each tile I will use a simple LinearLayout, however you could alternatively use a Card view.
<LinearLayout xmlns:android="http://schemas.android.com/apk/res/android"
    android:layout_width="wrap_content"
    android:layout_height="wrap_content"
    android:orientation="vertical">

    <ImageView
        android:layout_width="match_parent"
        android:layout_height="wrap_content"
        android:adjustViewBounds="true"
        android:scaleType="centerCrop" />

    <TextView
        android:layout_width="match_parent"
        android:layout_height="wrap_content"
        android:gravity="center" />

</LinearLayout>
[su_row][su_column size=”2/3″]Nothing fancy up there. Just an ImageView and a TextView for a title. This is the layout for each of our tile. Now this is akin to each list item in your typical ListView.
I am purposely skipping our MainActivity‘s layout since its just a RecyclerView. We’ll skip that and head onto creating our adapter and hooking it up to our RecyclerView.[/su_column]
[su_column size=”1/3″]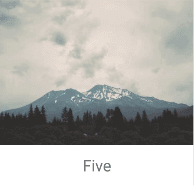 [/su_column][/su_row]
Adapter
If you’re familiar with custom ListView in the past, you should be aware of a ViewHolder. This is basically the layout for EACH item in our list.
 class MasonryView extends RecyclerView.ViewHolder {
        ImageView imageView;
        TextView textView;

        public MasonryView(View itemView) {

            imageView = (ImageView) itemView.findViewById(R.id.img);
            textView = (TextView) itemView.findViewById(R.id.img_name);

        }
    }
Now we need to create our RecyclerView’s adapter and tell it to use this ViewHolder of ours.
public class MasonryAdapter extends RecyclerView.Adapter<MasonryAdapter.MasonryView> {
    private Context context;

    int[] imgList = {R.drawable.two, R.drawable.one, R.drawable.three, R.drawable.four,
            R.drawable.five, R.drawable.six, R.drawable.seven, R.drawable.eight,
            R.drawable.nine, R.drawable.ten};

    String[] nameList = {"One", "Two", "Three", "Four", "Five", "Six",
            "Seven", "Eight", "Nine", "Ten"};

    public MasonryAdapter(Context context) {
        this.context = context;
    }

    @Override
    public MasonryView onCreateViewHolder(ViewGroup parent, int viewType) {
        View layoutView = LayoutInflater.from(parent.getContext()).inflate(R.layout.grid_item, parent, false);
        MasonryView masonryView = new MasonryView(layoutView);
        return masonryView;
    }

    @Override
    public void onBindViewHolder(MasonryView holder, int position) {
        holder.imageView.setImageResource(imgList[position]);
        holder.textView.setText(nameList[position]);
    }

    @Override
    public int getItemCount() {
        return nameList.length;
    }
}
Nothing much to explain here, except that its our regular RecyclerView adapter. Nothing out of the ordinary, I’m pretty sure everyone’s familiar with this by now.
To populate my Staggered Grid, I’m simply using 10 random images loaded from my drawable folder, named one to ten.
Attaching the Adapter
With all that set, all that is needed is to attach this created adapter of ours to our RecyclerView.
Note that the key here is the LayoutManager. This helps determine the layout of our RecyclerView. It could be a regular list, a uniform grid, or a staggered grid (which is what we what). This can further be defined to be scrollable either horizontally or vertically.
mRecyclerView.setLayoutManager(new StaggeredGridLayoutManager(2, StaggeredGridLayoutManager.VERTICAL));

        MasonryAdapter adapter = new MasonryAdapter(this);
        mRecyclerView.setAdapter(adapter);
Here, the parameters for the StaggeredGridLayoutManager is the number of columns and orientation respectively.
That’s all that’s needed to be done. Nothing fancy or out of the ordinary here. If you’re quite familiar with RecyclerView, you would realize that the only thing that needs to be changed is the LayoutManager that should be used is a StaggeredGridLayoutManager.
Staggered Grid Spacing Fix
Great so its done. Before you run along and test your app, let me stop you right there and ask you to include a tiny fix.
The issue is that, while I was building my sample, I noticed that setting a margin on my LinearLayout didn’t seem to work. There was no spacing between my tiles which made the entire list appear joined. This obviously is not what we want. So here’s a quick fix.
Create a new class that extends RecyclerView.ItemDecoration that helps add spacing around each tile. You might remember that ItemDecoration helps add things like a list divider for each row item.
public class SpacesItemDecoration extends RecyclerView.ItemDecoration {
    private final int mSpace;

    public SpacesItemDecoration(int space) {
        this.mSpace = space;
    }

    @Override
    public void getItemOffsets(Rect outRect, View view, RecyclerView parent, RecyclerView.State state) {
        outRect.left = mSpace;
        outRect.right = mSpace;
        outRect.bottom = mSpace;

        // Add top margin only for the first item to avoid double space between items
        if (parent.getChildAdapterPosition(view) == 0)
            outRect.top = mSpace;
    }
}
Now just tell our RecyclerView to add this ItemDivider simply:
SpacesItemDecoration decoration = new SpacesItemDecoration(16);
mRecyclerView.addItemDecoration(decoration);
Feel free to add any value you wish for SpacesItemDecoration. That value determines the amount of spacing.
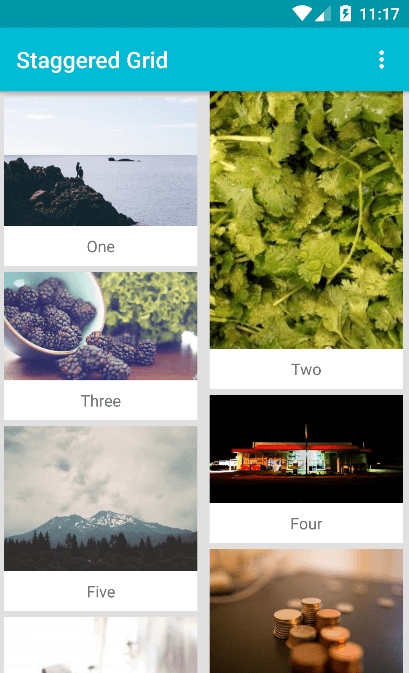
Final Results
I’m not going to stop you from running the app now, so go ahead and run it!
As always, here’s the GitHub link for the source code.
RecyclerView is pretty powerful as you can see. We were able to create a Pinterest masonry layout using a StaggeredGridLayoutManager. It is more flexible that the previous ListView (which I still see a few people using) and strongly suggest you migrate to its better alternative. Its brilliant how just by changing the LayoutManager, we were able the change the face of a regular RecyclerView to come up with something creative.


You could just use isomorph?
https://codecanyon.net/item/isomorph-grid-layout-system/22671209
how can i add a onItemClickListener to the recycler view… the object mRecyclerView is not implementing setOnItemClick Listener….
how to load images from internet in this ‘Pinterest layout App’ instead of using it from drawable??????
Hi Avinash,
I suggest you take a look at this tutorial. It has exactly what you need: http://blog.grafixartist.com/image-gallery-app-android-studio-1-4-glide/
Thanks…
why can’t I download the app? after I clicked the “ok” button in the dialog which is below this article title, it turned to an email fill website. and I filled my e-mail, then it turned to another page with a list. then I clicked one item, it turned to another list… again and again, and nothing was downloaded!
You can download the entire app project via GitHub: https://github.com/Suleiman19/Masonry
Nice tutorial! I have also implemented a StaggeredGrid. The problem that I’m having is that after I placed all the items and I start scrolling all the way down and then back up, they start to change position. Do you have any idea why that might happen ?
That’s not supposed to happen. I need to look at your Adapter class and how you’re loading the images. Think you could post on Stack Overflow? I’ll take a look.
stackoverflow.com/questions/33530387/android-recyclerview-staggeredgrid-items-changing-position-on-scrolling
Hi jokur,
Please do not spam.
As I can see you’ve already got an answer on StackOverflow, which is exactly what I would have suggested as well.
The answer says to move this line: mImageLoader = MySingleton.getInstance(mContext).getImageLoader();
to the CONSTRUCTOR, and NOT the OnCreate().
Hope this resolves your issue 🙂
I tried that too. Nothing changes.
public StaggeredGridAdapter(Context context,List listItemsList,ImageLoader imageLoader){
this.gridItemsList = listItemsList;
this.mContext = context;
this.mImageLoader = imageLoader;
}
Hi jokur,
As I’ve said earlier, you still haven’t moved the singleton call to your constructor. Also I’d still go with the StackOverflow answer.
A random image assigned is most probably why the layout changes, setting image based on position will keep it fixed.
Please try to closely follow when people suggest a solution.
Man it s in the constructor. As for the random image, it s not random it s just 1 of the 2 links. It s just a string. I don t get what s so random about this. It should not influence anything. If you think I haven t done what he said just post a solution which would be appropriate. Why is it not in the constructor?
staggeredGridLayoutManager.setGapStrategy(GAP_HANDLING_NONE)
Good!
Question: If I add footView to load nextPage, when I return top of recyclView, the item will move.Can you fix it?
Thanks
Hi yan,
Not sure I follow that. Could you please post an image or video, to better highlight the issue?
Possibly post the question on StackOverflow so i can have a better look there.
Thanks.
May I hava your email? I will give you samples code. My English is bad. Sorry!
There are my email : 208949091@qq.com or yanyiheng86@163.com
I suggest you post on Stack Overflow instead.
ok
Thanks.
Nice example!
Question: If I have images that are all the same size, is there a way to dynamically set the height of each tile using say a random number between x and y?
I noticed in my case the tiles in the first column are only offset by the value passed into the SpacesItemDecoration constructor.
Thanks
The height of each tile is set dynamically by using ‘wrap_content’ for your ImageView. Ideally your images would have varying height.
But yes you can handle such things within the adapter., using the LayoutParams method inside the onBindViewHolder() method. Just keep in mind you need to redraw the imageview that way.
Awesome article, but take look at this post: It isn’t good approach to do
View layoutView = LayoutInflater.from(parent.getContext()).inflate(R.layout.grid_item, null);
it’s better to do
View layoutView = LayoutInflater.from(parent.getContext()).inflate(R.layout.grid_item, parentView, false);
https://possiblemobile.com/2013/05/layout-inflation-as-intended/
Wow, thanks for the heads up Andrii. I use the latter usually. Wonder how I missed that this time. Updated relevantly.
Thanks for the pointer.