Android Image Gallery App: Using Gestures and Transition
In this post, we’ll look at creating a Material Design style, image Gallery app for Android. It will support image gestures like zoom, as well as shared element transitions.
This is part two of the Create an Image Gallery App with Android Studio and Glide post. Previously, we created an Image Gallery app using Glide and Android Studio templates. If you’re not familiar with the basics, I strongly recommend you read part one. It will give you a solid understanding of Glide and Layout Managers.
One of the most commonly used apps on Android is the image gallery app. Have you ever wondered, how images are displayed in a continuous list? What about using gestures such as pinch zoom on images?
In this post, we will learn how to implement exactly these. We will also take a dive into shared element transitions and learn how to use it for Fragments.
We will also use a custom view called PhotoView which can be used in placed of the regular ImageView. I’ll show you how awesome PhotoView is soon.
Creating the Image Gallery App
We will be using 2 popular libraries in our gallery.
- Glide – powerful, yet simple to use image loading library by Square.Inc
- PhotoView – flexible ImageView that supports gestures such as zoom and pan
So first, let’s start by adding the above dependencies. Add the following lines to your app’s build.gradle file.
repositories {
    maven {
        url "https://jitpack.io"
    }
}
dependencies {
    ...
    compile 'com.squareup.picasso:picasso:2.5.2'
    compile 'com.github.chrisbanes:PhotoView:2.0.0'
}
First off, we need to create a model class for our images.
public class ImageModel implements Parcelable {

   private String name, url;

   //TODO: Add your Getters and setters here.
}
Next up, we need to create our Activity. The only one that we will be using in this Android tutorial. We will use Fragments to handle everything else.
We will create an ‘Empty Activity‘ using Android Studio. Let’s call it MainActivity as per convention.
Utility class for Image loading
Before we go ahead and code, we’ll create a utility class. This will provide us with the image data.
We could keep this code inside an Activity too, but using a separate utility class helps keep our code clean.
    public class Utils {

        static String IMGS[] = {
                "https://images.unsplash.com/photo-1444090542259-0af8fa96557e",
                "https://images.unsplash.com/photo-1439546743462-802cabef8e97",
                "https://images.unsplash.com/photo-1441155472722-d17942a2b76a",
                .
                //more image links
        };

        public static ArrayList<ImageModel> getData() {
            ArrayList<ImageModel> arrayList = new ArrayList<>();
            for (int i = 0; i < IMGS.length; i++) {
                ImageModel imageModel = new ImageModel();
                imageModel.setName("Image " + i);
                imageModel.setUrl(IMGS[i]);
                arrayList.add(imageModel);
            }
            return arrayList;
        }
    }
Defining Click Interface for Gallery Images
To handle clicks on images in the gallery, we will create a simple interface. This will help listen to click events.
    public interface GalleryItemClickListener {
        void onGalleryItemClickListener(int position, ImageModel imageModel, ImageView imageView);
    }
Creating the Image Gallery Adapter
Next, we need to create an adapter that will handle the RecyclerView data and display it.
RecyclerView offers powerful list and grid display options via LayoutManager. You can learn about RecyclerView’s LayoutManager via the Staggered Grid article.
So here’s how we define our RecyclerView.Adapter. It’s very basic. Almost like how every standard adapter would be.
    public class GalleryAdapter extends RecyclerView.Adapter<GalleryAdapter.GalleryViewHolder> {

        private final GalleryItemClickListener galleryItemClickListener;
        private ArrayList<ImageModel> galleryList;

        public GalleryAdapter(ArrayList<ImageModel> galleryList, GalleryItemClickListener galleryItemClickListener) {
            this.galleryList = galleryList;
            this.galleryItemClickListener = galleryItemClickListener;
        }

        @Override
        public GalleryViewHolder onCreateViewHolder(ViewGroup parent, int viewType) {
            return new GalleryViewHolder(LayoutInflater.from(parent.getContext())
            .inflate(R.layout.gallery_item, parent, false));
        }

        @Override
        public void onBindViewHolder(final GalleryViewHolder holder, int position) {
            final ImageModel imageModel = galleryList.get(position);

            Glide.with(holder.galleryImageView.getContext()).
                    load(imageModel.getUrl())
                    .thumbnail(0.5f)
                    .diskCacheStrategy(DiskCacheStrategy.ALL)
                    .into(holder.galleryImageView);

            holder.galleryImageView.setOnClickListener(new View.OnClickListener() {
                @Override
                public void onClick(View v) {
                    galleryItemClickListener.onGalleryItemClickListener(holder.getAdapterPosition(), imageModel, holder.galleryImageView);
                }
            });
        }

        @Override
        public int getItemCount() {
            return galleryList.size();
        }

        static class GalleryViewHolder extends RecyclerView.ViewHolder {
            private ImageView galleryImageView;

            GalleryViewHolder(View view) {
                super(view);
                galleryImageView = (ImageView) view.findViewById(R.id.galleryImage) ;
            }
        }
    }
The layout of the RecyclerView items is as follows.
    <ImageView xmlns:android="http://schemas.android.com/apk/res/android"
    android:id="@+id/galleryImage"
    android:layout_width="match_parent"
    android:layout_height="128dp"
    android:layout_margin="1dp"
    android:adjustViewBounds="true"
    android:scaleType="centerCrop" />
Nothing fancy till now. We have created a regular RecyclerView.Adapter. This uses an interface to handle click events. Then we use Glide to load the image into our ImageView.
You can however save yourself trouble and NOT write RecyclerView.Adapter boilerplate code. Learn to use FastAdapter to write easier, smaller and faster RecyclerView Adapter code.
Using Fragments instead of Activities
Fragment to hold our RecyclerView.public class RecyclerViewFragment extends Fragment {
    public static final String TAG = RecyclerViewFragment.class.getSimpleName();

    public RecyclerViewFragment() {
    }


    public static RecyclerViewFragment newInstance() {
        return new RecyclerViewFragment();
    }

    @Override
    public void onCreate(Bundle savedInstanceState) {
        super.onCreate(savedInstanceState);

    }

    @Override
    public View onCreateView(LayoutInflater inflater, ViewGroup container,
                             Bundle savedInstanceState) {
        return inflater.inflate(R.layout.fragment_recycler_view, container, false);
    }

    @Override
    public void onViewCreated(View view, @Nullable Bundle savedInstanceState) {
        super.onViewCreated(view, savedInstanceState);
        GalleryAdapter galleryAdapter = new GalleryAdapter(Utils.getData(),this);
        RecyclerView recyclerView = (RecyclerView) view.findViewById(R.id.recycler_view);
        GridLayoutManager gridLayoutManager = new GridLayoutManager(getContext(), 2);
        recyclerView.setLayoutManager(gridLayoutManager);
        recyclerView.setAdapter(galleryAdapter);
    }
}
In the onViewCreated() method, we create our RecyclerView.Adapter (GalleryAdapter). Notice that Utils.getData() provides a list of images which we populated.
Next, we create a GridLayoutManager which consists of two columns. Finally, we attach the adapter and LayoutManager to RecyclerView.
Another type of GridLayoutManger is the StaggeredGridLayoutManager. The Pinterest Android app uses this and you can learn how to do it too.
Here’s the Fragment XML layout.
<LinearLayout xmlns:android="http://schemas.android.com/apk/res/android"
    android:layout_width="match_parent"
    android:layout_height="match_parent">

    <android.support.v7.widget.RecyclerView
        android:id="@+id/recycler_view"
        android:layout_width="match_parent"
        android:layout_height="match_parent"
        android:clipToPadding="false" />

</LinearLayout>
Now, let’s launch the RecyclerViewFragment from our MainActivity.
public class MainActivity extends AppCompatActivity {

    @Override
    protected void onCreate(Bundle savedInstanceState) {

        getSupportFragmentManager()
                .beginTransaction()
                .add(R.id.content, RecyclerViewFragment.newInstance())
                .commit();
    }
}
Our gallery view is ready. Now if you run the code, you should get something like this
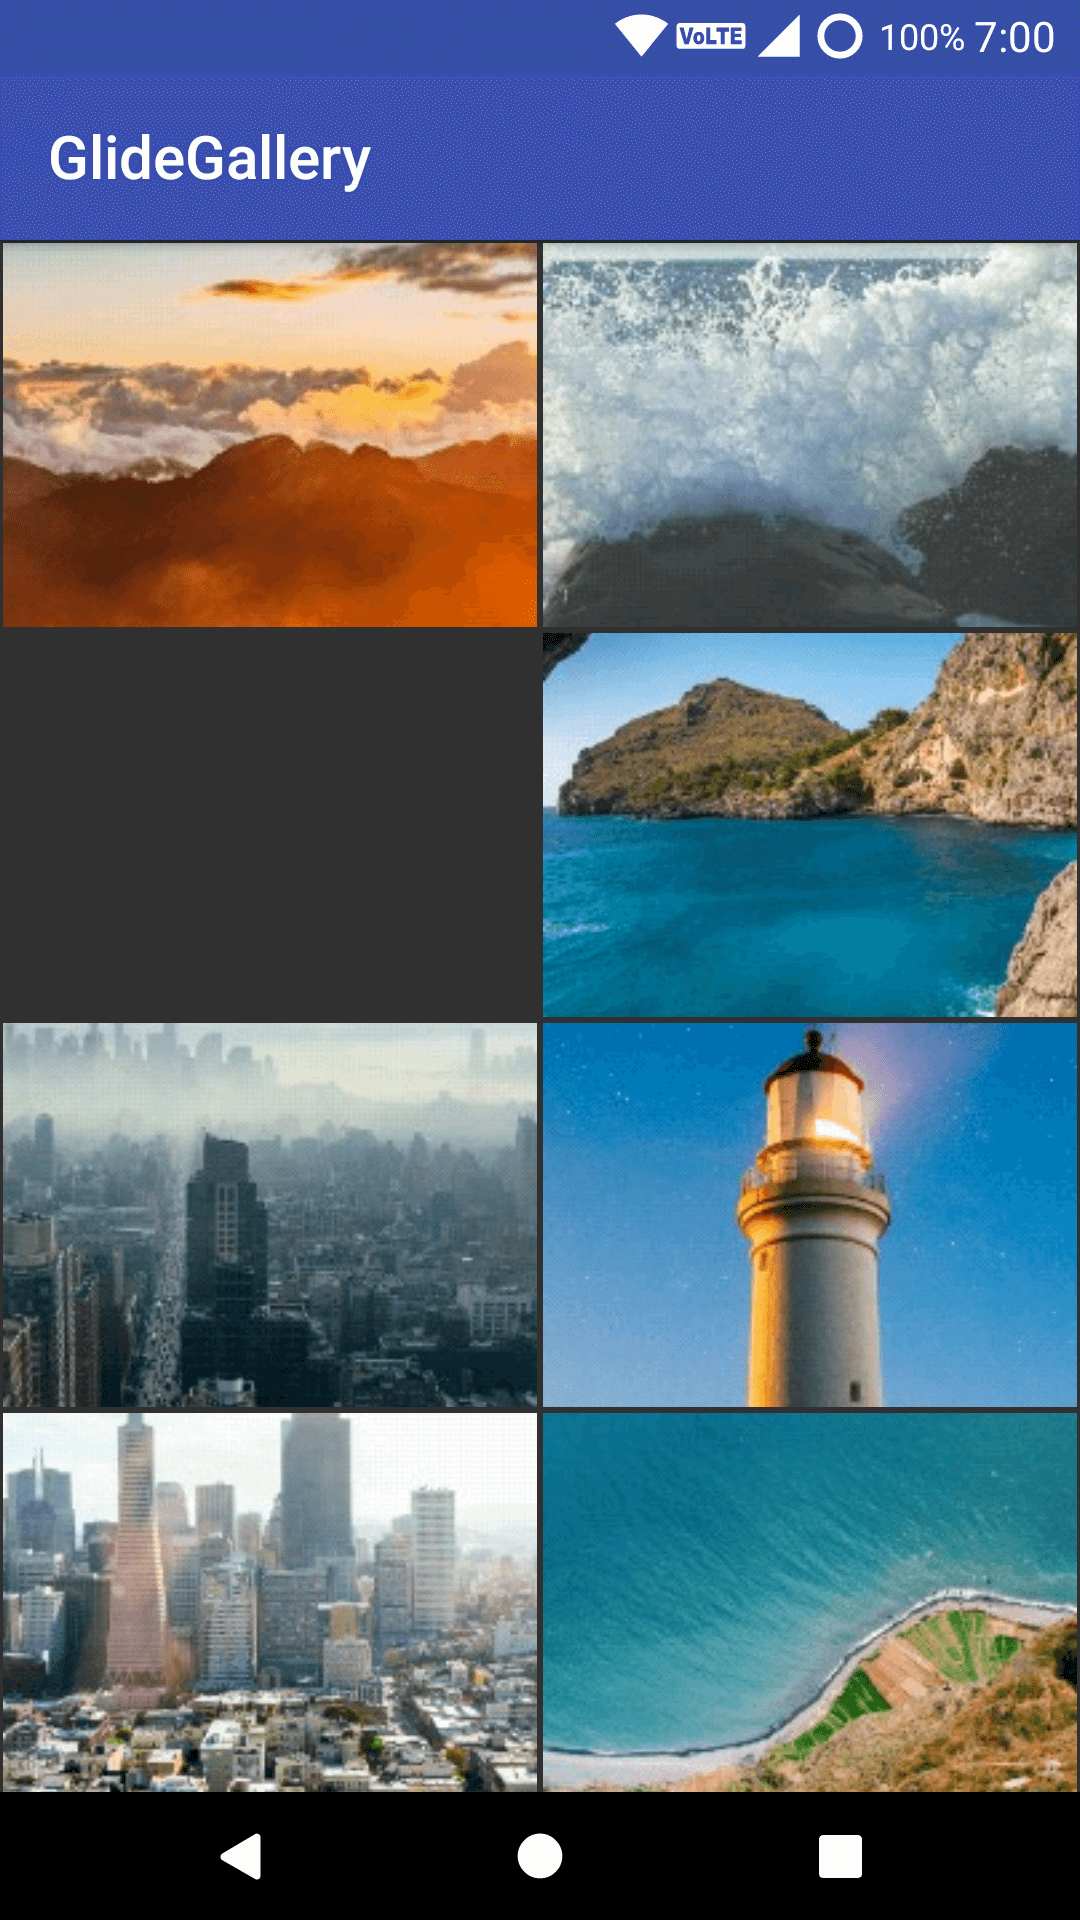
Gallery View
Launching Full-screen Gallery Images
Now we will start implementing the view where can see the images in fullscreen. We will use a Fragment to display each image. Let’s call this Fragment ImageDetailFragment.
public class ImageDetailFragment extends Fragment {

    private static final String EXTRA_IMAGE = "image_item";

    public ImageDetailFragment() {
        // Required empty public constructor
    }

    public static ImageDetailFragment newInstance(ImageModel image) {
        ImageDetailFragment fragment = new ImageDetailFragment();
        Bundle args = new Bundle();
        args.putParcelable(EXTRA_IMAGE, image);
        fragment.setArguments(args);
        return fragment;
    }

    @Override
    public void onCreate(Bundle savedInstanceState) {
        super.onCreate(savedInstanceState);
    }

    @Override
    public View onCreateView(LayoutInflater inflater, ViewGroup container,
                             Bundle savedInstanceState) {
        return inflater.inflate(R.layout.fragment_image_detail, container, false);
    }

    @Override
    public void onViewCreated(View view, @Nullable Bundle savedInstanceState) {
        super.onViewCreated(view, savedInstanceState);

        final ImageModel image = getArguments().getParcelable(EXTRA_IMAGE);

        final PhotoView imageView = (PhotoView) view.findViewById(R.id.detail_image);

        Glide.with(getActivity())
                .load(image.getUrl())
                .asBitmap()
                .into(new SimpleTarget<Bitmap>() {
                    @Override
                    public void onResourceReady(Bitmap resource, GlideAnimation<? super Bitmap> glideAnimation) {
                        startPostponedEnterTransition();
                        imageView.setImageBitmap(resource);
                    }
                });
    }
}
The layout for fragment_image_detail.xml is as follows.
<com.github.chrisbanes.photoview.PhotoView xmlns:android="http://schemas.android.com/apk/res/android"
    android:id="@+id/detail_image"
    android:layout_width="match_parent"
    android:layout_height="wrap_content"
    android:adjustViewBounds="true"
    android:scaleType="fitCenter" />
Adding Gesture Support to ImageView
PhotoView.PhotoView allows us to add like features pinch to zoom, double tap to zoom. We use PhotoView in place of ImageView and that’s it. We’ll have a functional ImageView that supports gestures. Pretty easy right?ImageView. The image is first downloaded as a Bitmap and then loaded into ImageView.Swiping Images in Fragment – ViewPager
To get swipeable slides of images likes the one seen in galleries, we can use a ViewPager. It is a widget available in the Android Support Library.
Just like we need an adapter for a RecyclerView, we need one for our ViewPager too. Let’s name ours GalleryPagerAdapter.
public class GalleryPagerAdapter extends FragmentStatePagerAdapter {

    private ArrayList<ImageModel> images;

    public GalleryPagerAdapter(FragmentManager fm, ArrayList<ImageModel> images) {
        super(fm);
        this.images = images;
    }

    @Override
    public Fragment getItem(int position) {
        ImageModel image = images.get(position);
        return ImageDetailFragment.newInstance(image);
    }

    @Override
    public int getCount() {
        return images.size();
    }
}
getItem() method, you can see that it returns an instance of ImageDetailFragment.ViewPager works. They contain a series of Fragments of the same type. That’s what allows us to swipe across various slides (images in our case).ViewPager creates 3 instances of the Fragment to display, every time we view a slide. One to the left of the current slide and one to the right. Such a mechanism ensures a smooth scroll between slides. The good news is that this is internally handled. So you don’t have to worry about it.ViewPager along with Tabs. This tutorial can teach you how to use Android ViewPager with Material Design Tabs.Fragment to handle the ViewPager. We will call it GalleryViewPagerFragment.public class GalleryViewPagerFragment extends Fragment {
private static final String EXTRA_INITIAL_POS = "initial_pos";
private static final String EXTRA_IMAGES = "images";
public GalleryViewPagerFragment() {
}
public static GalleryViewPagerFragment newInstance(int current, ArrayList<ImageModel> images) {
GalleryViewPagerFragment fragment = new GalleryViewPagerFragment();
Bundle args = new Bundle();
args.putInt(EXTRA_INITIAL_POS, current);
args.putParcelableArrayList(EXTRA_IMAGES, images);
fragment.setArguments(args);
return fragment;
}
@Override
public void onCreate(Bundle savedInstanceState) {
super.onCreate(savedInstanceState);
}
@Override
public View onCreateView(LayoutInflater inflater, ViewGroup container,
Bundle savedInstanceState) {
// Inflate the layout for this fragment
return inflater.inflate(R.layout.fragment_gallery_view_pager, container, false);
}
@Override
public void onViewCreated(View view, @Nullable Bundle savedInstanceState) {
super.onViewCreated(view, savedInstanceState);
int currentItem = getArguments().getInt(EXTRA_INITIAL_POS);
ArrayList<ImageModel> images = getArguments().getParcelableArrayList(EXTRA_IMAGES);
GalleryPagerAdapter galleryPagerAdapter = new GalleryPagerAdapter(getChildFragmentManager(), images);
ViewPager viewPager = (ViewPager) view.findViewById(R.id.animal_view_pager);
viewPager.setAdapter(galleryPagerAdapter);
viewPager.setCurrentItem(currentItem);
}
}
In onViewCreated(), we create a ViewPager object. Then we set an instance of GalleryPagerAdapter as its Adapter.
Handling Clicks; Launching the Detail View
Now that all the required classes have been created, we have one tiny thing left. Yes, you guessed it right.
We have to launch the ViewPager when an image in the gallery view is clicked. That’s really simple. We need to use the onGalleryItemClickListener interface. So go ahead and implement that in RecyclerViewFragment.
public class RecyclerViewFragment extends Fragment implements GalleryItemClickListener{

    public static final String TAG = RecyclerViewFragment.class.getSimpleName();

    @Override
    public void onGalleryItemClickListener(int position, ImageModel imageModel, ImageView imageView) {

        GalleryViewPagerFragment galleryViewPagerFragment = GalleryViewPagerFragment.newInstance(position, Utils.getData());

        getFragmentManager()
                .beginTransaction()
                .addToBackStack(TAG)
                .replace(R.id.content, galleryViewPagerFragment)
                .commit();
    }
}
Since we’re working with Fragments, the back press by default works for Activity only addToBackStack() remembers the Fragment we added. So now when we press the Back button, we go back to the gallery view, instead of exiting the app.
That’s it! You have now created a fully functional image gallery app. We saw how to display images from the internet using Glide. Additionally, we also added gesture capability such as zoom and pan using PhotoView.
Shared Element Transition
Lastly, don’t forget that I promised animations. Material Design brought in a new type of transition called Shared Element Transition.
The transition focuses on content and its representation in the new activity. Such a transition makes the experience a lot more seamless.
A transition when two screens (Activities or Fragments) share one or more common views. But, it is available only on API level 21 and above.
Remember this. You need to properly setup an Android project theme styles to use Material Design.
Alternatively, you can use this free Material Design starter project. It has everything configured, so you can start building your app right away.
So let’s get started and add shared element transitions to our gallery app.
The way shared element transitions work is that a shared view has a unique transition name. This allows the view to be shared during the transition. We add this transition name in the GalleryAdapter.
public class GalleryAdapter extends RecyclerView.Adapter<GalleryAdapter.GalleryViewHolder> {

    @Override
    public void onBindViewHolder(final GalleryViewHolder holder, int position) {
        final ImageModel imageModel = galleryList.get(position);

        // Set transition name same as the Image name
        ViewCompat.setTransitionName(holder.galleryImageView, imageModel.getName());

        holder.galleryImageView.setOnClickListener(new View.OnClickListener() {
            .
        });
    }
}
We set the transition name as the image name. This ensures that the transition name is unique for all the images in the gallery.
ViewPager from the RecyclerView, we need to mention the shared View. In other words, the View being shared with the ViewPager. We do this by using the addSharedElement() method.public class RecyclerViewFragment extends Fragment implements GalleryItemClickListener{
@Override
public void onGalleryItemClickListener(int position, ImageModel imageModel, ImageView imageView) {
GalleryViewPagerFragment galleryViewPagerFragment = GalleryViewPagerFragment.newInstance(position, Utils.getData());
getFragmentManager()
.beginTransaction()
.addSharedElement(imageView, ViewCompat.getTransitionName(imageView))
.addToBackStack(TAG)
.replace(R.id.content, galleryViewPagerFragment)
.commit();
}
}
The addSharedElement() method takes a View and its transition name as parameters.
So now we have told our FragmentManager about the transition. Next, we have to notify the ImageDetailFragment about the transition. We also need to include a parameter for the transition name.
public class ImageDetailFragment extends Fragment {

    private static final String EXTRA_TRANSITION_NAME= "transition_name";

    public static ImageDetailFragment newInstance(ImageModel image, String transitionName) {
        ImageDetailFragment fragment = new ImageDetailFragment();
        Bundle args = new Bundle();
        args.putParcelable(EXTRA_IMAGE, image);
        args.putString(EXTRA_TRANSITION_NAME, transitionName);
        fragment.setArguments(args);
        return fragment;
    }

    @Override
    public void onViewCreated(View view, @Nullable Bundle savedInstanceState) {
        super.onViewCreated(view, savedInstanceState);

        String transitionName = getArguments().getString(EXTRA_TRANSITION_NAME);

        if (Build.VERSION.SDK_INT >= Build.VERSION_CODES.LOLLIPOP) {
            imageView.setTransitionName(transitionName);
        }

        ...
    }
}
That’s it. Our shared element transition should work. But wait, there is a small glitch!
Achieving Smoother Transitions
If you run the app now, you will notice that we do not get any smooth transition.
This is because it is overridden by the default Fragment transition. So we need a way to delay the enter transition for the Fragments. We can do so in the onCreate() methods of ImageDetailFragment and GalleryViewPagerFragment.
     @Override
     public void onCreate(Bundle savedInstanceState) {
         super.onCreate(savedInstanceState);
         postponeEnterTransition();
         if (Build.VERSION.SDK_INT >= Build.VERSION_CODES.LOLLIPOP) {
            setSharedElementEnterTransition(
                  TransitionInflater.from(getContext())
                        .inflateTransition(android.R.transition.move)
                  );
        }
    }
You will notice that there’s an API level check. This is done to ensure backwards compatibility. Remember that Shared Element Transitions are available only in API level 21+.
And finally, our app is ready!
The source code for the app is available on GitHub.
Wrap up
In this post, we learnt how to create a gallery view step by step. We also learnt about PhotoView and how to use it in our app to get some amazing gesture support. We implemented shared element transition between our two screens to give the feel of a continuous UI.
Did you like PhotoView? Will you be using shared element transitions in your app? I would love to hear from you in the comments below.
I am an Android developer and an active Mozillian. In my free time, I contribute to Open Source and watch lots of anime.


shared transition doesn’t work
What happens if we are using a FirebaseRecyclerAdapter to load the gallery. how to get a arraylist then?
Hi Subhrajyoti. This is great code! I am trying to integrate your code into my application, but I want to retrieve the URL list from a network location using Volley instead of the static string array in your Utils class. Any hints as to how I might go about that? I have tried several approaches, but no luck so far.
Thank you very much for the helpful tutorial!!!