Android Pagination Tutorial – Adding Swipe-to-Refresh

Pagination allows loading a long list of data in chunks. You see this in action in news feeds in social media apps, otherwise known as endless or infinite scrolling. In this tutorial, I will specifically show you how to handle pagination with Swipe-to-Refresh involved.
It took quite a while but finally, welcome to Part 5 of the Android Pagination Tutorial Series!
Previously in part 4, we looked at how to handle pagination when many View Types are involved.
Swipe-to-Refresh (as Android prefers to call it) or Pull To Refresh (as it is originally called) is a popular way of refreshing your data. But, when you have pagination in play, things can get a little tricky. In this tutorial, I will show you how to handle all those scenarios and implement swipe-to-refresh with pagination.
This article has been updated for AndroidX!
Android Pagination Series Overview –
- Getting Started with RecyclerView
- Pagination with APIs using Retrofit and Gson
- Error Handling
- Using Multiple RecyclerView Types
- Adding Swipe-to-Refresh Support
NOTE
This is a continuation of the Pagination series. Hence this article (code included) assumes that you’ve read and implemented what was discussed in the previous parts.
If you’re new, I suggest starting with Part 1 — Implementing the Pagination logic. Otherwise, if you think you’re good, read on!
What is Swipe-to-Refresh?
The pull-to-refresh (or swipe-to-refresh) pattern lets a user pull down on a list of data using touch to retrieve more data.
– Pull to Refresh pattern as defined by Nick Babich
This pattern was first introduced by Loren Brichter in the Tweetie app (which was acquired by Twitter back in 2010). In fact, the design pattern became so popular that Twitter even holds a patent on it!
When to use it?
Swipe to Refresh is best to use this gesture with dynamic content that has frequent updates…
– Swipe to Refresh as defined in Material Design
Material Design has very detailed guidelines on Swipe to refresh, how to design for it and when to use it. I recommend everyone to read it.
Now what we know what Swipe to Refresh is and when to use it. Let’s get to actually implementing it.
Implementing Swipe-to-Refresh
To implement Swipe to Refresh, we need to do 3 things.
- Add the
SwipeRefreshLayout - Add support via a refresh menu action
- Creating the refresh callback action
Once we’ve done these 3, we need to tie in our pagination callbacks with the Swipe to Refresh action. Let’s begin with the first step.
Add the SwipeRefreshLayout
Go to the MainActivity layout file, activity_main.xml and add the SwipeRefreshLayout.
You’ll have a RecyclerView layout that we’re using to handle the pagination. This RecyclerView now needs to be wrapped with a SwipeRefreshLayout. Look at the XML layout’s skeleton below for the code.
<FrameLayout>
    <android.support.v4.widget.SwipeRefreshLayout
        android:id="@+id/main_swiperefresh"
        android:layout_width="match_parent"
        android:layout_height="match_parent">

        <androidx.recyclerview.widget.RecyclerView />

    </android.support.v4.widget.SwipeRefreshLayout>

    <ProgressBar />
</FrameLayout>
Add the Refresh Menu Item
From a design perspective, if you think about your app’s users, a refresh action is needed on your Toolbar.
You should add a refresh action to your app’s action bar to ensure that users who may not be able to perform a swipe gesture can still trigger a manual update.
– Android Developer Guidelines
Start by adding the refresh icon to your Activity‘s menu.xml file.
<menu>
    <item
        android:id="@+id/menu_refresh"
        android:title="@string/menu_refresh"
        app:showAsAction="never"/>
</menu>
Next, override the onOptionsItemSelected() method in your Activity.
@Override
public boolean onOptionsItemSelected(MenuItem item) {
 switch (item.getItemId()) {
  case R.id.menu_refresh:
   // Signal SwipeRefreshLayout to start the progress indicator
   swipeRefreshLayout.setRefreshing(true);
   doRefresh();
 }
 return super.onOptionsItemSelected(item);
}
Note that when the Swipe-to-Refresh action is triggered, you need to show that it’s refreshing. That’s what the loading indicator shows.

But also be sure to dismiss it when the refreshing is complete. You can do this by swipeRefreshLayout.setRefreshing(false).
Note the doRefresh() method. This will handle our actual refresh logic which I will cover in the next step.
TIP
A good app is one that thinks about its diverse user base. Adding an explicit refresh action helps with accessibility, allowing people to see an action that they otherwise wouldn’t.
So that’s one for good UX design! Now that we have the UI controls in place, the last thing we need to do is create the Swipe-to-Refresh callback.
Now we’ve created a working Swipe-to-Refresh UI control. But, it doesn’t do anything yet. Next, let’s hook our Pagination to this.
Create the Refresh Callback Action
Before we get to the doRefresh() method, we’ve added the action via the Toolbar menu’s refresh. But what about the actual Swipe-to-Refresh?
In other words, we need to listen when we swipe from the top. The same doRefresh() action will happen when we trigger Swipe-to-Refresh. We can do this via a simple listener.
In your Activity, add this code to its onCreate() method.
swipeRefreshLayout.setOnRefreshListener(this::doRefresh);NOTE
The above code is simplified with Java 8 Lambdas for Android.
The doRefresh() method will handle the actual logic of refreshing via Swipe-to-Refresh.
private void doRefresh() {
 progressBar.setVisibility(View.VISIBLE);
 if (callTopRatedMoviesApi().isExecuted())
  callTopRatedMoviesApi().cancel();

 adapter.getMovies().clear();
 adapter.notifyDataSetChanged();
 loadFirstPage();
 swipeRefreshLayout.setRefreshing(false);
}
Here’s what the doRefresh() method does.
First, remember to show the progress indicator. Clearing the adapter and making a fresh request can make the screen blank.
Then, check if any API’s are being executed, these are the page load requests. If you recall, it is one single API call to which we pass the page number. This is done via the callTopRatedMoviesApi() method. Hence, we check if this API called is being executed and if yes, cancel it.
Next, we clear the list of existing data and notify the adapter of these changes. Then, we make a fresh request to the first page. Lastly, don’t forget to setRefreshing(false).
Remember that the doRefresh() method will be triggered regardless of whether it is via a swipe or via refresh in the Toolbar.
The Problem with this Approach
Swipe-to-Refresh (going by its very definition), allows you to update (refresh) the existing data you have.
In pagination, the first page is loaded and presented by default. Page 2 and beyond loads as you keep scrolling down to the bottom of the list.
When you trigger a Swipe-to-Refresh, you request for page 1 again and load its fresh data. All other consecutive page data is removed and Pagination will begin fresh.
When to actually refresh?
While that’s simple on paper, doing as I mentioned above is wrong. Think about it, constantly calling Swipe-to-Refresh keeps making a request for Page 1. But do we even know if Page 1 has updated or fresh data to display? If it is the same data, why are we making a network call for the same thing?
So how do we go about this? We use caching.
Use Caching
Caching allows us to store the data on memory and has an expiry (time) range associated with it. As long as the data hasn’t expired, making a network call for that data will request the cache rather than the network.
When it has expired, the cache becomes stale. This time when a request is made, it is made from the network allowing fresh data to be displayed and the cache to be updated.
NOTE
As app developers, we need to be judicious with consuming data. We don’t want to be spamming API calls that have no meaning. It wastes data and server resources.
So what do we need to do? With Swipe-to-Refresh or Pagination, there is no logic change. But, what we do need to do is modify Retrofit to support caching.
Modifying Retrofit to Support Caching
While this might be out of scope for this tutorial, it is essential to establish good practices. In this scenario, doing a Swipe-to-Refresh with pagination can abuse the network calls. Caching can help prevent this and encourage developers to build a performant app.
So firstly, we need to modify Retrofit to support caching in its network requests. To do this, open the MovieApi class. There are 3 things we need to do.
- Declare cache
- Define
Interceptorto read cache - Add both to your Client Builder
1. Declare Cache
public class MovieApi {
 // 10MB Cache size
 private final static long CACHE_SIZE = 10 * 1024 * 1024;
 ...

 private static OkHttpClient buildClient(Context context) {
  ...
  // Create Cache
  Cache cache = new Cache(context.getCacheDir(), CACHE_SIZE);

  return new OkHttpClient
   .Builder()
   ...
   .cache(cache)
   .build();
 }
}
2. Define Interceptor to Read Cache
Next, define the Interceptor. This allows us to intercept the network requests we make and read their Cache-Control headers.
public class MovieApi {
 ...
 private static OkHttpClient buildClient(Context context) {
   // Build interceptor
   final Interceptor REWRITE_CACHE_CONTROL_INTERCEPTOR = chain -> {
    Response originalResponse = chain.proceed(chain.request());
    if (NetworkUtil.hasNetwork(context)) {
     int maxAge = 60; // read from cache for 1 minute
     return originalResponse.newBuilder()
      .header("Cache-Control", "public, max-age=" + maxAge)
      .build();
    } else {
     int maxStale = 60 * 60 * 24 * 28; // tolerate 4-weeks stale
     return originalResponse.newBuilder()
      .header("Cache-Control", "public, only-if-cached, max-stale=" + maxStale)
      .build();
    }
   };
   ...
  }
  ...
}
Finally, we must add this to our OkHttpClient.Builder. So it finally will look like this.
return new OkHttpClient
 .Builder()
 .addNetworkInterceptor(REWRITE_CACHE_CONTROL_INTERCEPTOR)
 .cache(cache)
 .build();
So we first, created our Cache and added it to the request builder. Next, we created an interceptor to read the Cache-Control headers from every request and added that to the request builder too.
Request from Network or Cache?
Now that we’ve modified Retrofit to support caching, how do we actually know if a specific request is from cache or not?
A simple if-else condition check for the Response will tell us.
if (response.raw().cacheResponse() != null) {
 //    Cache Response
} else {
 //    Network Response
}
You can read more about this on StackOverflow.
Tying it all with Swipe-to-Refresh
With this simple modification, you can use the above if-else to check where your data is coming from. You can log your network requests to check. The very first time you make a request, it’ll be from the network. When a request is made again, it comes from the cache. The latter will continue to happen until the cache goes stale (expires).
Just a stepping point…
I don’t want to digress too much from the goal of this tutorial, which is to implement Swipe-to-Refresh and support pagination.
However, we went beyond to use good design principles and implemented caching. Although this implementation works, it is very simple in its working and scope.
I highly encourage you to go beyond and fully test the caching mechanism.
For instance, let’s look at the doRefresh() method again.
private void doRefresh() {
 progressBar.setVisibility(View.VISIBLE);
 if (callTopRatedMoviesApi().isExecuted())
  callTopRatedMoviesApi().cancel();

 adapter.getMovies().clear();
 adapter.notifyDataSetChanged();
 loadFirstPage();
 swipeRefreshLayout.setRefreshing(false);
}
This method currently refreshes the adapter with fresh data. By fresh I mean fetching from cache again if a network request was already made. In other words, you’re clearing the Adapter and repopulating it with the SAME data. Wouldn’t you agree that’s wasted work?
A better way to do this is to NOT repopulate the data. Don’t clear the data and load the first page again. Instead, you could make a short API call or check to see if there is any fresh data available in the server, if yes, then perform the actual swipe to refresh. Now you know there’s fresh data available which will make the fetch meaningful.
TIP
A better approach is to not wait for the cache to expire. Rather check the server if there is fresh data available. If yes, then refresh the adapter with new data. Otherwise, don’t bother doing the reload with Swipe-to-Refresh since it is the same data.
If you’re interested in reading more about Caching with Retrofit, Midorks has a great Medium article on it.
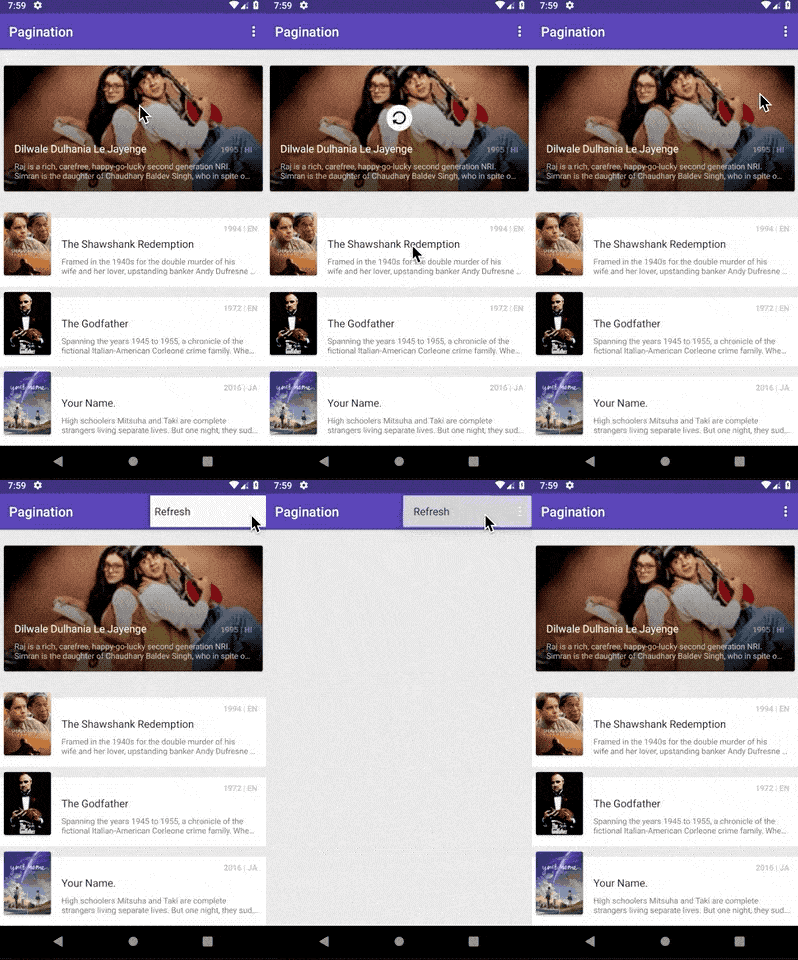
Output
Now that we’ve done all that’s needed to implement Swipe-to-Refresh for pagination, let’s see how it looks like in action.

Project Available on GitHub
Wrapping up
In this tutorial, we looked at adding Swipe-to-Refresh support to Pagination. Again, the hardest part was implementing the Pagination logic, which we’ve done in Part 1. Swipe-to-Refresh was a simple add-on to that relatively.
Next, we also looked at implementing a simple caching mechanism by modifying Retrofit. This allowed us to not abuse network calls with Swipe-to-Refresh.
Lastly, if you’ve read the tutorial up to this point, this marks the end of the Pagination tutorial series. Congratulations on making through all five parts!
I hope you found this useful as I’ve enjoyed writing this for you.
Have I covered everything you need to know about adding Pagination in your apps? Or do you have any questions? Tell me in the comments below and I’ll get back to you.
Lastly, if you loved reading this article, share it with others so they can learn too!


“Your style is so unique in comparison to other people I’ve read
stuff from. Thanks for posting when you hav the opportunity,
Guess I will just bookmark this page.”
Thanks for this incredible guide, Loved your post.
Its one of the best article I have read till date.
I am glad that I found this informative blog.
Thanks for posting !! Keep Blogging !!
Looking forward to know more from you.
hello sir pagination is not work after swip refresh