
If you’ve heard about Parse back-end, then you’ll also know that its a wonderful service which simplifies back-end management for your Android apps. Let’s look at adding a Facebook login experience using Parse. This is part one of the post where I’ll take time to help you familiarize yourself with these services. Along with integrating Parse, we’ll also look look at adding a Facebook login to our app. For simplicity’s sake, in part one we’ll ONLY be looking at integrating the two. I will be mentioning essentials only, so that you can be swiftly done with a tedious boring process. We will first create a backend server for our app using Parse, upload test data to your backend as a check and then finally add the Facebook SDK and link it to Parse.
What is Parse?
Parse is a Backend as a Service (BaaS). It helps maintain a backend for your app, eliminating the need for you to manage a server or get caught in server side code. Parse greatly simplifies this process with their Android SDK. You’ll wonder at just how much you’re able to do with so little code, it’s almost a miracle! Their pricing plans is quite generous as well so its more than enough for our purposes. Even for small realtime apps!
Facebook SDK
Facebook’s SDK for Android lets us augment our apps with powerful social features. But for now, we’re only interested in their Login feature. We need to connect Facebook’s SDK to Parse first. Upon doing so, we can handle Facebook login with Parse.
Android Studio Setup
I’m including my Gradle settings in case any of you should run into issues, you can cross check here first :-)
- compileSdkVersion 23
- buildToolsVersion 23.0.2
- minSdkVersion 15
- targetSdkVersion 23
- support libraries 23.1.1
Setting up Parse
Start off with creating a Parse account (if you don’t have one). You’ll be presented with a welcome screen.

New Project
Click Data> Mobile> Android> Native (Java)> Existing Project Now you could go ahead following Parse’s on screen instructions, but I strongly suggest you follow mine instead for a more updated approach. But don’t close that page just yet. Why existing? Because trust me, its better to add Parse manually to our app. On the last step, start off with downloading the latest SDK from there, or here. Hate to break it to you, but unlike other libraries that we include via a single line in Gradle, Parse doesn’t give us such a luxury (yet). So we’ll have to download the library and include the .jar manually.
dependencies {
    ...
    compile 'com.parse.bolts:bolts-android:1.3.0'
    compile 'com.parse:parse-android:1.12.0'
}
Connect app to Parse
With the libraries in place, we need to now add the respective permissions to the Manifest file and initialize Parse with our unique App ID.
Create a new class ‘MyApp’ extending Application and add this:
public class MyApp extends Application {

    @Override
    public void onCreate() {
        super.onCreate();

        // Enable Local Datastore.
        Parse.enableLocalDatastore(this);

        Parse.initialize(this);
    }
}
If you didn’t close your Parse page yet, the last step will conveniently display your applicationId and clientKey you can just copy it over. Head over to your AndroidManifest.xml and add this directly under your application tag.
...If all goes well, there won’t be any errors being highlighted using the Parse API.
Test
However, lets not jump to conclusion and just test if our app is really connected. As Parse says, add the following code in your MainActivity.java onCreate method.
ParseObject testObject = new ParseObject("TestObject");
testObject.put("foo", "bar");
testObject.saveInBackground();
Run your app once, hit the Test button and all should be well :-) Once you’re through with that, head over to the Dashboard and click your App. Click the Core tab above. You should see the Data with a class ‘TestObject’ and one data entry.

Each data you insert is part of a class which you must define. You can see from the above code sample that “foo” is our column name and “bar” is its corresponding data. To retrieve the data you would use testObject.get("foo"); Parse has a really good documentation which is a pleasure to read. I highly recommend that you spend some time reading it.
Finally we’ve included the Parse Android SDK, linked our app with Parse and even tried storing test data to confirm that it works. Now we’ll move onto adding the Facebook SDK for the login.
Adding Facebook SDK
We need to setup Facebook’s SDK to be used with Parse. Head over to Facebook and add a new Android app. Now you can follow the on screen instructions over at Facebook to integrate but as always, I suggest you follow this post to get the long version short. You might have noticed that when we copied over the Parse.jar, we did so for the FacebookUtils.jar as well. This is what that’s going to help us link Facebook so Parse can handle the login for us. Add this line to your Gradle to include the Facebook SDK in your app:
compile 'com.facebook.android:facebook-android-sdk:4.7.0'Do try to follow closely from this point on, otherwise the SDK won’t work. You could have a coffee, relax and get back!
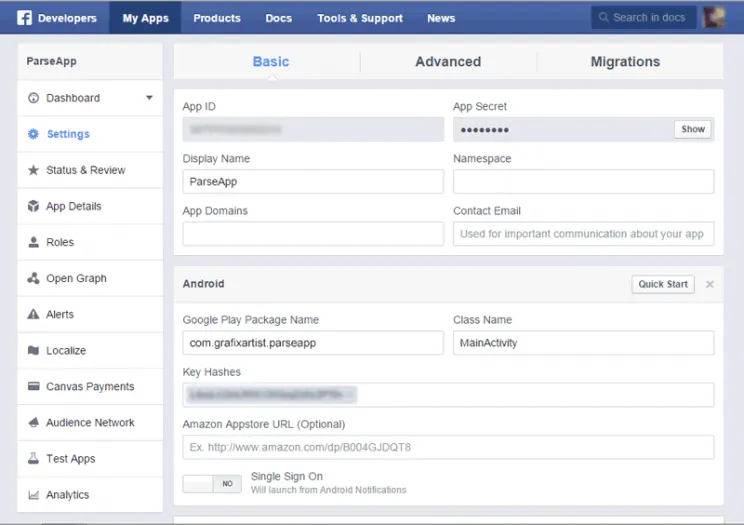
Key Hash
Just head over to the Key Hashes section in Quick Start. Add your package name and just the ‘class’ name for the ‘Default Activity Class Name’. Make sure you save the development key hash. To generate a key hash, use this code snippet and then run your app.
try {
            PackageInfo info = getPackageManager().getPackageInfo(
                    "com.suleiman.parseapp",
                    PackageManager.GET_SIGNATURES);
            for (Signature signature : info.signatures) {
                MessageDigest md = MessageDigest.getInstance("SHA");
                md.update(signature.toByteArray());
                Log.d("KeyHash:", Base64.encodeToString(md.digest(), Base64.DEFAULT));
            }
        } catch (PackageManager.NameNotFoundException e) {

        } catch (NoSuchAlgorithmException e) {

        }
Copy the key hash from your logs. Head over to your app’s Settings and paste your key hash there. This key is required to access any data from Facebook with their Graph API.
NOTE: If you happen to get a key hash related error when running your app in the future (after the integration), Facebook will show your key hash along with your error. You can manually type that into your App> Settings.
Linking Facebook to Parse
Go to your Parse app’s Settings> Authentication and enable Facebook. Copy over your ‘App ID’ and ‘App Secret’ from Facebook over to your Parse Settings.

Open your AndroidManifest.xml and add these directly below the
...Initialize ParseFacebookUtils
ParseFacebookUtils allows Parse to hook up with Facebook. This makes sign up via Facebook as seamless as possible. We need to import a library for that:
dependencies {
           ...
           compile 'com.parse:parsefacebookutils-v4-android:1.10.3@aar'
}
Initialize Parse with Facebook in your MyApp.java’s onCreate method. Make sure you do it AFTER Parse.initialize
ParseFacebookUtils.initialize(this);Now, for whichever Activity that will implement the login, head over to that very Activity.java and add this method.
@Override
    protected void onActivityResult(int requestCode, int resultCode, Intent data) {
        super.onActivityResult(requestCode, resultCode, data);
        ParseFacebookUtils.onActivityResult(requestCode, resultCode, data);
    }
After this, if you want you can try a simple Facebook GraphRequest or even signing up the user yourself via Facebook through Parse, if you’re feeling bold enough! However this post has gone long enough, so head over to Part 2 for the rest.
Now give yourself a pat on the back if you’ve made it this far. You’ve successfully integrated both Parse AND Facebook SDK for your app, and that sir, is no ordinary feat! In the next part, we’ll look at how to do a proper Facebook login, pull required user information, store it on Parse and then display it. Give yourselves some credit for making it to the end. Hope you’ve been able to follow along. For further queries, fire away in the comments below and as always, I’d be happy to help. Cheers.