If you’ve managed to survive Part 1, then welcome to Part 2 of the post! Here we’ll look at actually integrating Facebook login with Parse. We’ll fetch needed details from Facebook, sign up the user with Parse and store those details. In the previous part, we focused solely on getting Parse and Facebook SDK integrated in our apps, which by in itself was no ordinary feat. Now let’s dive into our app and get these things to work.
Why Social Sign In?
The very fact that why we opt for a social login is to provide a richer login experience. The user already has his registered credentials on Facebook. We can use that do validate an existing user, rather than asking him to manually fill input fields. This is tedious on the user’s part, which can be avoided. Moreover we can optionally pull other relevant data, which we can utilize to provide a richer user experience.
Create a Login Experience
The reason why I’ve purposely labelled it a login ‘experience’ which in short is your login screen, is because this is where users get to see your app for the first time, and if they don’t like it now, they’re probably never going to return. This is the very first screen your user will see and I strongly you spend ample time creating a good signup screen. Here’s mine:
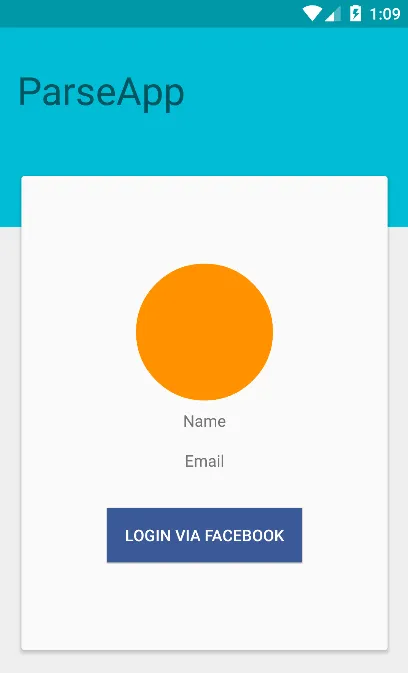
But for practice purposes, just a button would do for now. This button on click, will log in the user via Facebook.
Facebook Login
mBtnFb.setOnClickListener(new View.OnClickListener() {
           @Override
           public void onClick(View v) {
         ParseFacebookUtils.logInWithReadPermissionsInBackground(MainActivity.this, mPermissions, new LogInCallback() {
                   @Override
                   public void done(ParseUser user, ParseException err) {

                       if (user == null) {
                           Log.d("MyApp", "Uh oh. The user cancelled the Facebook login.");
                       } else if (user.isNew()) {
                           Log.d("MyApp", "User signed up and logged in through Facebook!");
                           getUserDetailsFromFB();
                       } else {
                           Log.d("MyApp", "User logged in through Facebook!");
                           getUserDetailsFromParse();
                       }
                   }
               });
           }
       });
The logInWithReadPermissionsInBackground is what we’ll use to log in the user. We must supply a list of permissions to this method. This is akin to an AsyncTask. The LogInCallback provides a done() method. This is essentially what you must do upon log in completion. The 3 if conditions are clearly denoted by their respective Log tags. Upon logging in for the very first time, the app will redirect you to a Facebook screen where he/ she must consent that your app requires their Facebook information. After this we’re back to our app. So now, you might want to take the user to your home screen with a successful Toast message! Alternatively, if it get’s cancelled you should handle the error.
New Users
user.isNew() helps us identify that a new user is signing up. So after they log in via Facebook, we will retrieve their profile photo, name and email from Facebook. Then we will save those details to Parse. The getUserDetailsFromFB() method will help in fetching our Facebook data.
private void getUserDetailsFromFB() {

     // Suggested by https://disqus.com/by/dominiquecanlas/
     Bundle parameters = new Bundle();
     parameters.putString("fields", "email,name,picture");

     new GraphRequest(
             AccessToken.getCurrentAccessToken(),
             "/me",
             parameters,
             HttpMethod.GET,
             new GraphRequest.Callback() {
                 public void onCompleted(GraphResponse response) {
         /* handle the result */
                     try {

                         email = response.getJSONObject().getString("email");
                         mEmailID.setText(email);

                         name = response.getJSONObject().getString("name");
                         mUsername.setText(name);

                         JSONObject picture = response.getJSONObject().getJSONObject("picture");
                         JSONObject data = picture.getJSONObject("data");

                         //  Returns a 50x50 profile picture
                         String pictureUrl = data.getString("url");

                         new ProfilePhotoAsync(pictureUrl).execute();

                     } catch (JSONException e) {
                         e.printStackTrace();
                     }
                 }
             }
     ).executeAsync();

 }
As you can see, in essence this method will be responsible for executing 2 AsyncTasks:
- GraphRequest - to fetch user name and email
- AsyncTask (native) - to download profile photo and display on ImageView
The GraphRequest can help us fetch all sorts of data from Facebook. It requires some time understanding how it works, so I suggest you go through. The GraphResponse returns back JSON data which we can use to retrieve our required information. If you’re unfamiliar with JSON parsing and how it works on Android, you can follow this brilliant post on AndroidHive that explains it brilliantly. However, that’s only if you’re interested in learning more. For the purposes of this post, you can just copy over my code snippet and it will work just fine :-)
saveNewUser()
If you noticed carefully, we call this method in the onCompleted() method of our GraphRequest. Why because, this method indicates what must be done upon completing the fetch request. This means that the requested data has been fetched. So once that is done, we can safely store our data in Parse. Doing so before might result in a crash! Alternatively, see the AsyncTask where we download our profile photo. If this takes longer to execute, then our saveNewUser() will still fail. Know why? We’re attempting to download the photo while the AsyncTask may still be executing. If your AsyncTask takes a while, then again the app would crash. I have purposely done it this way to highlight the various issues when tasks execute in parallel. The fail safe way would be to call saveNewUser() in your AsyncTask’s onPostExecute() method.
  private void saveNewUser() {
        parseUser = ParseUser.getCurrentUser();
        parseUser.setUsername(name);
        parseUser.setEmail(email);

//        Saving profile photo as a ParseFile
        ByteArrayOutputStream stream = new ByteArrayOutputStream();
        Bitmap bitmap = ((BitmapDrawable) mProfileImage.getDrawable()).getBitmap();
        bitmap.compress(Bitmap.CompressFormat.JPEG, 70, stream);
        byte[] data = stream.toByteArray();
        String thumbName = parseUser.getUsername().replaceAll("\\s+", "");
        final ParseFile parseFile = new ParseFile(thumbName + "_thumb.jpg", data);

        parseFile.saveInBackground(new SaveCallback() {
            @Override
            public void done(ParseException e) {
                parseUser.put("profileThumb", parseFile);

                //Finally save all the user details
                parseUser.saveInBackground(new SaveCallback() {
                    @Override
                    public void done(ParseException e) {
                        Toast.makeText(MainActivity.this, "New user:" + name + " Signed up", Toast.LENGTH_SHORT).show();
                    }
                });

            }
        });

}saveInBackground(), evident by the method (Yep you guessed it!) is used to save our user details to Parse via an AsyncTask. You can optionally have a SaveCallback if you want to do anything after a successful save. I’ve just showed a simple Toast notifying the user he signed up. The ParseUser class is used to fetch information from Parse related to the user, which we have defined globally and initialize only when needed. We set our user’s email and username from what we retrieved from Facebook. Then we save our downloaded Facebook profile photo Bitmap as a ParseFile. Note how I’m saving this file. I dynamically create the thumbnail’s file name based off the username. ‘profileThumb’ is a column which will automatically be created in our User class if it doesn’t exist.
Profile Photo AsyncTask
Create a new class called ProfilePhotoAsync and make it extend AsyncTask. Now I’m not going too in depth about what these are for the post’s sake.
AsyncTask enables proper and easy use of the UI thread. This class allows to perform background operations and publish results on the UI thread without having to manipulate threads and/or handlers.
In short, any task that will take time to execute or its duration to finish is unknown. If it risks stalling the UI making the app non responsive, then AsyncTask is your solution. This is exactly what we’ll use to download our profile photo from Facebook.
class ProfilePhotoAsync extends AsyncTask {
      public Bitmap bitmap;
      String url;

      public ProfilePhotoAsync(String url) {
          this.url = url;
      }

      @Override
      protected String doInBackground(String... params) {
          // Fetching data from URI and storing in bitmap
          bitmap = DownloadImageBitmap(url);
          return null;
      }

      @Override
      protected void onPostExecute(String s) {
          super.onPostExecute(s);
          mProfileImage.setImageBitmap(bitmap);

          saveNewUser();
      }
  }
The brunt of your work must be done in the doneInBackground() method, which is why we’re handling the actual download there. After your task is complete, what is be done next must come in the onPostExecute() method. When this method enters, our download task would be complete. So now we can set our downloading bitmap to our ImageView.
DownloadImageBitmap()
We’ll use this handy utility method to handle our download. We simply pass a URL as a parameter to this method, which will return a Bitmap at the end. NOTE: Network operations must be run off the UI thread!
public static Bitmap DownloadImageBitmap(String url) {
        Bitmap bm = null;
        try {
            URL aURL = new URL(url);
            URLConnection conn = aURL.openConnection();
            conn.connect();
            InputStream is = conn.getInputStream();
            BufferedInputStream bis = new BufferedInputStream(is);
            bm = BitmapFactory.decodeStream(bis);
            bis.close();
            is.close();
        } catch (IOException e) {
            Log.e("IMAGE", "Error getting bitmap", e);
        }
        return bm;
    }
Whoa! That was really long. Let’s take a breather here and look at what we’ve done so far. Up till now we’ve seen how to handle a NEW user. Fetched relevant details and photo from Facebook and saved it to Parse. Just make sure you’re testing this app on a REAL device so we have internet and Facebook to work with. LG Nexus 5 is said to be the best device for this by many. Do run the app just ONCE. Log in and you will get a Toast saying you signed up. Great! Back to the post. We’ll now show a Welcome back Toast if its a returning user that logs in. This is what your Parse panel should show you, after successfully running it once. There is now one new entry in your User class. Note all the relevant details from your Facebook fed into your Parse backend.

Returning User
We will simply fetch 3 data from Parse: name, email and profile photo (which we saved to a ParseFile).
 private void getUserDetailsFromParse() {
        parseUser = ParseUser.getCurrentUser();

//Fetch profile photo
        try {
            ParseFile parseFile = parseUser.getParseFile("profileThumb");
            byte[] data = parseFile.getData();
            Bitmap bitmap = BitmapFactory.decodeByteArray(data, 0, data.length);
            mProfileImage.setImageBitmap(bitmap);
        } catch (Exception e) {
            e.printStackTrace();
        }

        mEmailID.setText(parseUser.getEmail());
        mUsername.setText(parseUser.getUsername());

        Toast.makeText(MainActivity.this, "Welcome back " + mUsername.getText().toString(), Toast.LENGTH_SHORT).show();

    }
The email and username is fetched after initializing ParseUser and directly passed on to our TextViews. The ParseFile is retrieved via parseUser by specifying the ‘key’ (column name in the table). However, simply retrieving the file will not suffice so we basically have to undo the file conversion steps we did while storing the Bitmap into a ParseFile. Here, we have to reconstruct the Bitmap from the ParseFile data. Finally after all that, display a Toast welcoming back the user! Finally run the app now (second time) and log in via Facebook. You will see our name, email and profile photo appearing. Nothing new same as last time, but as developers, we know that only this time, the data which was earlier saved in Parse, is now being retrieved. :-)
End Result
I know the post has been long without any visual result. But finally here’s an output you all can feast your eyes on!
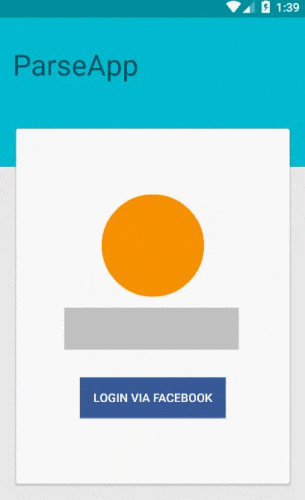
Do ignore the grey rectangle in the middle. That’s just me doing a miserable job of trying to hide my email ;-) Also note that the Facebook confirmation screen for you will look different (better and faster). I’m using an emulator (which sucks). You can also check out this code sample on GitHub. Just be sure to replace your Facebook AppID, Parse Application ID and Client Key in values/strings.xml.
Great. Now go ahead and jump in joy as you’re done with this long post. Don’t forget to Follow @Suleiman_194 and subscribe (below) for instant updates!