Let’s look at how fast we can create a simple image gallery app in Android using Glide. An image loading and caching library which takes care of almost everything for us.
Glide is a fast and efficient open source media management and image loading framework for Android that wraps media decoding, memory and disk caching, and resource pooling into a simple and easy to use interface.
We’ll be creating an image gallery app, pretty common for Android app development. We will use Glide to handle image loading and caching. Then load these images in fullscreen upon tap. This will use a ViewPager allowing us to swipe between images.
After updating to Android Studio 1.4, I’m glad that they’ve updated the default app templates as well. We will be using this to make quick work of the app. Let’s get started.
Fire up Android Studio 1.4 and create a new app.
- Minimum SDK: API 14 Android 4.0
- Choose the ‘Blank Activity’ template and next, hit Finish//img on the right
- Remove the Floating Action Button (FAB) from your layout and Activity
- Include Glide in your build.gradle file:
compile 'com.github.bumptech.glide:glide:3.6.1' - Add Android Support v4 library, since Glide depends on it
NOTE: I’m using grade version 1.4.0-beta3.
MainActivity
This simply consists of a RecyclerView, its adapter, item layout and its POJO model class.
Android Image Gallery Layout
As expected, Android Studio has already added a skeleton layout for us (courtesy of the Design Support Library). You should be pretty familiar with the Design Support library by now, so I’m just mentioning the layout skeleton here.
<android.support.design.widget.CoordinatorLayout >

    <android.support.design.widget.AppBarLayout >

        <android.support.v7.widget.Toolbar
            android:id="@+id/toolbar"/>

    </android.support.design.widget.AppBarLayout>

    <android.support.v7.widget.RecyclerView
        android:id="@+id/list"
        android:layout_width="match_parent"
        android:layout_height="match_parent"
        app:layout_behavior="@string/appbar_scrolling_view_behavior" />

</android.support.design.widget.CoordinatorLayout>
If you don’t know what the Design Support library is, I strongly suggest you do. You can get started here. It covers the basics. While its not really required for this tutorial, you’d be surprised at how the library lets you create popular design patterns with ease.
Image Gallery Item Layout
This is the layout for EACH item the RecyclerView will hold. Since ours is an Android image gallery app, it will be a grid layout with each item being a square holding the image.
<!--    list_item.xml   -->
<ImageView xmlns:android="http://schemas.android.com/apk/res/android"
    android:id="@+id/item_img"
    android:layout_width="match_parent"
    android:layout_height="128dp"
    android:layout_margin="1dp"
    android:adjustViewBounds="true"
    android:scaleType="centerCrop" />
Layout Item Model
Being familiar with RecyclerViews should tell you that it needs an Adapter and a custom layout. Also to bridge the layout and its data we will create a model POJO class ImageModel. This will contain getter setters for our data. For our image gallery app, just the image URL, and title will suffice.
public class ImageModel {

    String name, url;

    public ImageModel() {
    }
    // Getters & Setters here

}
QUICK TIP: To automatically generate getter setters, place your cursor on the variable you want to generate for. Hit Ctrl+Space, from the Generate popup, select Getter and Setter.
Layout Adapter
Adapter’s aren’t something that need a tutorial and I’m sure you’ve done this a hundred times yourselves, so go ahead and add that for me will ya? Here’s mine, just in incase 😉
Using Glide to Load Images into Adapter
In the onBindViewHolder method is essentially where we ‘bind’ our data to each layout item, based on position.
We’ll use Glide to load our images for us into the ImageView.
Glide.with(context).load(data.get(position).getUrl())
                   .thumbnail(0.5f)
                   .crossFade()
                   .diskCacheStrategy(DiskCacheStrategy.ALL)
                   .into(((MyItemHolder) holder).mImg);
The Glide API, is seriously fun to use. It shares a striking resemblance to Picasso, so Picasso users will feel right at home with Glide. Every Glide call starts with the with() method providing a context.
- load() – provide the URL for Glide to load
- thumbnail() – provide the size multiplier for thumbnail size
- crossFade() – for a smoothly fading in the loading image into ImageView
4. diskCacheStrategy(ALL) – saves the source and result data (images) into cache. AKA faster loading, but larger cache. Alternatively use DiskCacheStrategy.RESULT
5. into(targetView) – this the layout ‘into’ which the image must be loaded.
Also, you can specify a placeholder and error layout for your ImageView with Glide, using the placeholder() and error() methods respectively.
Putting the Adapter Together
So far, you should have a RecyclerView, a RecyclerView adapter using the list_item.xml and the list model POJO class. With all this in check, lets head over to MainActivity.java and connect them together.
NOTE:
For this tutorial, I’m storing 10 image URLs in an array.
I’m just going to use a regular boring Grid layout here. But if you’re up for something more interesting like the StaggeredGridLayout (like in Pinterest), read Create a Pinterest Style Masonry Layout.
public class MainActivity extends AppCompatActivity {
…
ArrayList<ImageModel> data = new ArrayList<>();
public static String IMGS[] = {
// Your image URLs here
};

@Override
protected void onCreate(Bundle savedInstanceState) {
…
for (int i = 0; i < IMGS.length; i++) {
//	Adding images & title to POJO class and storing in Array (our data)
ImageModel imageModel = new ImageModel();
imageModel.setName("Image " + i);
imageModel.setUrl(IMGS[i]);
data.add(imageModel);
}
…
mRecyclerView = (RecyclerView) findViewById(R.id.list);
mRecyclerView.setLayoutManager(new GridLayoutManager(this, 3));
mRecyclerView.setHasFixedSize(true); // Helps improve performance

mAdapter = new GalleryAdapter(MainActivity.this, data);
mRecyclerView.setAdapter(mAdapter);
…
}
}
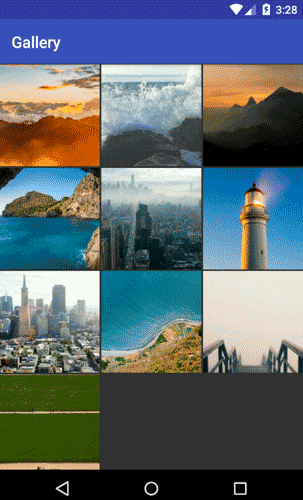
Go ahead, run your app now, you should get a nice grid getting populated with images loaded from the internet (courtesy of Glide). You can see how Glide loads in a low resolution image first and then transitions a higher quality one.
Give yourself a pat on the back for coming this far. Next, we’ll implement the Detail view; the fullscreen gallery complete with swiping between images.
Detail Activity
You needn’t alter anything in the DetailActivity’s layout so instead open your fragment_detail.xml layout. Simply throw in an ImageView and we’re done.
<ImageView
    android:id="@+id/detail_image"
    android:layout_width="match_parent"
    android:layout_height="match_parent"
    android:adjustViewBounds="true"
    android:scaleType="fitCenter" />
Android Studio ViewPager Template
Again, Android Studio 1.4 makes this easy for us with a prebuilt template we can use.
Right click package > New > Activity > Tabbed Activity. In the dialog, make sure Navigation Style is set to Swipe Views (ViewPager). My Activity name is DetailActivity.
Here’s the Activity structure for your reference:
public class DetailActivity extends AppCompatActivity {
…
@Override
protected void onCreate(Bundle savedInstanceState) {
…
}

/**
* A FragmentPagerAdapter that returns a fragment corresponding to
* one of the sections/tabs/pages.
*/
public class SectionsPagerAdapter extends FragmentPagerAdapter {
…
}

/**
* A placeholder fragment containing a simple view.
*/
public static class PlaceholderFragment extends Fragment {
…
@Override
public View onCreateView(LayoutInflater inflater, ViewGroup container,
Bundle savedInstanceState) {
View rootView = inflater.inflate(R.layout.fragment_detail, container, false);
…
return rootView;
}
}
}
Frankly, 80% of the setup process is already done. You have a Fragment setup, the ViewPager and its adapter as well. Everything is defined. All you need to do is point your data to it.
Passing ArrayList Data between Activities
Yes we’re aware of passing data between Activities using Intents and Bundles. But what if we want to pass an ArrayList holding a custom object? Like in our case ArrayList<ImageModel> ?
Simple. Make the class imageModel implement Parcelable. Now some of you may use Serializable, but here’s why its a bad idea.
With this done, we can now pass this ArrayList via an Intent. So head back to MainActivity.java, add a click listener for your RecyclerView trigger the DetailActivity.
mRecyclerView.addOnItemTouchListener(new RecyclerItemClickListener(this,
        new RecyclerItemClickListener.OnItemClickListener() {

@Override
public void onItemClick(View view, int position) {

Intent intent = new Intent(MainActivity.this, DetailActivity.class);
intent.putParcelableArrayListExtra("data", data);
intent.putExtra("pos", position);
startActivity(intent);

}
}));
I’ve declared my data variable like this: ArrayList<ImageModel> data = new ArrayList<>();
NOTE: If you’re having trouble rolling in your own click listener for RecyclerView. You can just use this one instead as a more loosely coupled solution.
Now you can retrieve your data in DetailActivity.java like this:
data = getIntent().getParcelableArrayListExtra("data");
pos = getIntent().getIntExtra("pos", 0);
Remember that in a typical gallery app, the Toolbar (ActionBar) will change name according to the image’s title. So upon launching this Activity, there must be an initial title. You can add one like this: setTitle(data.get(pos).getName());
Every time the ViewPager is swiped, the new image’s title must be updated. Do that using the ViewPager’s addOnPageChangeListener() method.
mViewPager.addOnPageChangeListener(new ViewPager.OnPageChangeListener() {
 	…
@Override
public void onPageSelected(int position) {
setTitle(data.get(position).getName());
}
…
});
Passing Data to ViewPager Adapter
This can simply be done by passing your ArrayList<ImageModel> data as a parameter to the SectionsPageAdapter.
With this you can modify the adapter as such:
public SectionsPagerAdapter(FragmentManager fm, ArrayList<ImageModel> data) {
    super(fm);
    this.data = data;
}

@Override
public Fragment getItem(int position) {
return PlaceholderFragment.newInstance(position, data.get(position).getName(), data.get(position).getUrl());
}

@Override
public int getCount() {
return data.size();
}

@Override
public CharSequence getPageTitle(int position) {
return data.get(position).getName();
}
Now for the last step. Fetching the information passed in the PlaceHolderFragment’s newInstance() and using it to load the image in its layout.
Sending Data to Fragment using setArguments()
Android Studio gives me a warning saying passing data to Fragments via its constructor is a bad idea. So I’m going to trust that and use the setArguments() method for the same.
@Override
public void setArguments(Bundle args) {
    super.setArguments(args);
    this.pos = args.getInt(ARG_SECTION_NUMBER);
    this.name = args.getString(ARG_IMG_TITLE);
    this.url = args.getString(ARG_IMG_URL);
}

public static PlaceholderFragment newInstance(int sectionNumber, String name, String url) {
PlaceholderFragment fragment = new PlaceholderFragment();
Bundle args = new Bundle();
args.putInt(ARG_SECTION_NUMBER, sectionNumber);
args.putString(ARG_IMG_TITLE, name);
args.putString(ARG_IMG_URL, url);
fragment.setArguments(args);
return fragment;
}
Note that the arguments passed in newInstance() is bundled and passed into the setArguments() method. This is the way of passing data to Fragments.
In the setArguments() method, we can retrieve that data and handle them. So lastly, all that’s left is to let Glide work its magic in our Fragment’s ImageView.
ImageView imageView = (ImageView) rootView.findViewById(R.id.detail_image);

Glide.with(getActivity()).load(url).into(imageView);
That’s a wrap! Run your app and take a look. Your grid should now detect taps and load into fullscreen.
For this tutorial, we focused on creating a simple gallery. However, we haven’t looked into things like image gestures such as zoom and pan. Also, it would be nice if there were screen transition animations. Yes, Material Design animations.
Part 2 of the image gallery tutorial covers transitions and gesture. No gallery app is without gestures, so it’s definitely worth a read.
Picasso VS Glide
Picasso and Glide are very similar in terms of API, but Glide wins hands down in terms of pure speed. But the downside is slightly reduced image quality. Glide also has GIF support, which is another win over Picasso. You can view their comparison breakdown here.
We’ve seen how to rapidly create an Android image gallery app using Android Studio 1.4 Activity templates. Also handle images like a breeze using the Glide library. However I’ve barely scratched the surface in terms of Glide’s potential. So you can take a look at there full feature set here.
Hope this serves as a foundation for your Android gallery apps.


