
Pagination is also known as endless or infinite scrolling. This is achieved using RecyclerView. In this tutorial, I’ll show you how to paginate when multiple View Types are involved.
Welcome to part 4 of the Android Pagination Tutorial Series!
Previously in part 3, we identified various scenarios in which errors can occur. Then, we saw how to handle these Pagination errors via code and present them to users.
RecyclerView is well known for supporting multiple view types. What if you wanted to do that and paginate the list, at the same time? Let’s look at just that, in this tutorial.
This article has been updated for AndroidX!
Android Pagination Series Overview
- Getting Started with RecyclerView
- Pagination with APIs using Retrofit and Gson
- Error Handling
- Using Multiple RecyclerView Types
- Adding Swipe-to-Refresh Support
NOTE: This is a continuation of the Pagination series. Hence this article (code included) assumes that you’ve read and implemented what was discussed in the previous parts.
If you’re new, I strongly suggest you start with Part 1 — Implementing the Pagination logic. Otherwise, if you think you’re good, read on!
Supporting Multiple View Types in RecyclerView
Often, when you want to display a list, all the items aren’t the same. Commonly, your first item might be a hero image, followed by a list.
We all know too well that when multiple View Types are involved, the code tends to get verbose. Additionally, with Pagination in play, things are about to get ugly.
However, that doesn’t have to be the case. Code complexity should not scare you. Provided you spend little time organizing your codebase.
If you remember from the previous tutorials, we already have 2 view types in our RecyclerView.
- The regular list item
- Loading footer
But the loading footer is only temporary, it briefly appears until the next page loads. After that, it disappears.
So let’s go ahead and add a third View type — a Hero image as the first item in the list.
Creating the Hero ViewHolder
Adding a new View Type is a simple thing to do. If you’re familiar with RecyclerView, you should know this by now as well.
I strongly encourage you to create your own, without referencing this section. However, if you need help, I’ve got your back!
There’s no set way to go about it, but here are the steps:
- Create XML layout for your new View
- Update Item View Types
- Create it’s ViewHolder in RecyclerView
- Bind the View
Just 3 simple steps. Let’s start with 1.
1. Create XML Layout for new View Type
Create a new XML file res/layout/item_hero.xml.
As mentioned above, we will create a header for our list. Mine looks like this.
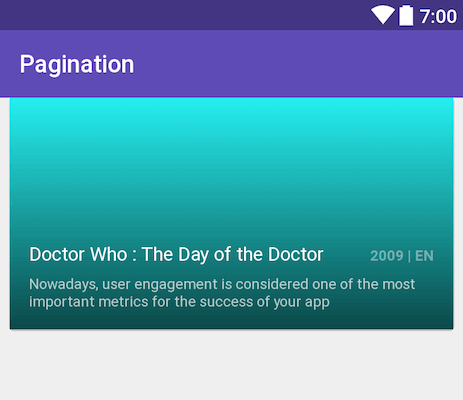
Feel free to use your creativity to make a layout you like. But if you want to use mine, you can get the layout file from GitHub.
2. Update Item View Types
Once your layout is created, we need to tell RecyclerView about it. Open PaginationAdapter.java and add a flag for our new (header) view type.
public class PaginationAdapter extends RecyclerView.Adapter < RecyclerView.ViewHolder > {

 // View Types
 private static final int ITEM = 0;
 private static final int LOADING = 1;
 private static final int HERO = 2;
 ...
}
Next, we need to tell our Adapter about which View should be displayed when. You do this in the getItemViewType() method.
 @Override
 public int getItemViewType(int position) {
  if (position == 0) {
   return HERO;
  } else {
   return (position == movieResults.size() - 1 && isLoadingAdded) ?
    LOADING : ITEM;
  }
 }
3. Create ViewHolder in RecyclerView
Start by creating an inner class for your ViewHolder in PaginationAdapter.
/**
 * Header ViewHolder
 */
protected class HeroVH extends RecyclerView.ViewHolder {
 private TextView mMovieTitle;
 private TextView mMovieDesc;
 private TextView mYear;
 private ImageView mPosterImg;

 public HeroVH(View itemView) {
  super(itemView);
  // init views
  mMovieTitle = (TextView) itemView.findViewById(R.id.movie_title);
  mMovieDesc = (TextView) itemView.findViewById(R.id.movie_desc);
  mYear = (TextView) itemView.findViewById(R.id.movie_year);
  mPosterImg = (ImageView) itemView.findViewById(R.id.movie_poster);
 }
}
With the ViewHolder created, we need to inflate it in onCreateViewHolder().
@Override
public RecyclerView.ViewHolder onCreateViewHolder(ViewGroup parent, int viewType) {
 RecyclerView.ViewHolder viewHolder = null;
 LayoutInflater inflater = LayoutInflater.from(parent.getContext());

 switch (viewType) {
  case HERO:
   View viewHero = inflater.inflate(R.layout.item_hero, parent, false);
   viewHolder = new HeroVH(viewHero);
   break;
   ...
 }
 return viewHolder;
}
4. Bind the View
Now that our header ViewHolder is created, it’s time to bind it. From the name, you would’ve known what I’m talking about. Yes, the onBindViewHolder() method!
@Override
public void onBindViewHolder(RecyclerView.ViewHolder holder, int position) {
 Result result = movieResults.get(position); // Movie

 switch (getItemViewType(position)) {

  case HERO:
   final HeroVH heroVh = (HeroVH) holder;

   heroVh.mMovieTitle.setText(result.getTitle());
   heroVh.mYear.setText(formatYearLabel(result));
   heroVh.mMovieDesc.setText(result.getOverview());

   loadImage(result.getBackdropPath())
    .into(heroVh.mPosterImg);
   break;
   ...
 }
}

// Bind method helpers

private String formatYearLabel(Result result) {
 return result.getReleaseDate().substring(0, 4) // we want the year only
  +
  " | " +
  result.getOriginalLanguage().toUpperCase();
}

private RequestBuilder < Drawable > loadImage(@NonNull String posterPath) {
 return GlideApp
  .with(context)
  .load(BASE_URL_IMG + posterPath)
  .centerCrop();
}
That’s all there is to it! That wasn’t as complex as you thought, was it? We already have 2 different View Types in play. We just added a third one.
The pagination logic wasn’t touched. So everything will work as it did, with the addition of a header View.
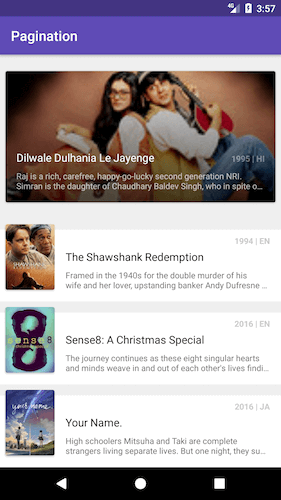
Don’t take my word though. Find out yourself with the output below!
Output — Final Result
Get the Source Code
The key to implementing any successful feature comes down to the basics. It’s the foundation. In the case of Pagination, it came down to implementing the Pagination logic correctly. Once that was done, add-on features were relatively easy to add. Like multiple View Types!
I hope with this tutorial, you’ll be able to paginate lists with different View Types.
What do you plan to create? Does this cover your use-cases? Tell me in the comments below.
Lastly, if you loved reading this article, share it with others so they can learn too!