The launch screen (or splash screen if you prefer), is the first thing your user’s going to see. In other words, it is a user’s first experience of your application. In this post I’ll show you how to create a branded launch screen / splash screen for your Android apps.
This is where you must do your best to impress the user. Use some flashy graphics, vibrant imagery along with a neat logo. Not trying to be harsh, but if you slack off here, he’s probably not going to return.
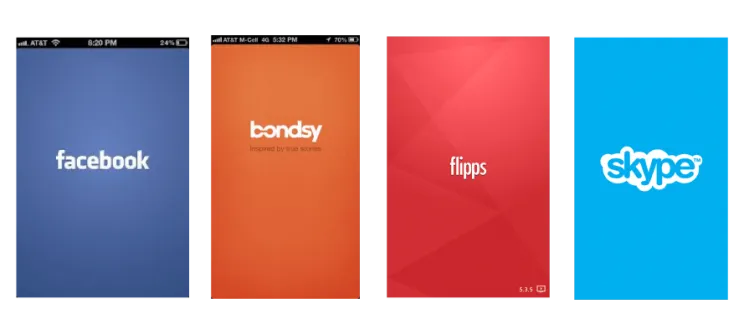
Here are a few examples to inspire you.
Why use a Launch / Splash Screen?
The launch screen is a user’s first experience of your application.
You can take this opportunity to briefly provide brand exposure, as a welcome screen. However, I suggest you have a more useful purpose than JUST this.
If your app is heavily dependent on data that would take a while to load, say you’re downloading images from a database, loading a URL or fetching information from a server. Without this your initial UI will look empty and increase it’s perceived loading time.
Such situations are a perfect for a launch screen. Use this opportunity to load data in the background. So while your launch screen is being displayed, a background task will be fetching the required data for your app.
Types of Launch Screens
The launch screen as mentioned by Material Design has two types:
- Branded Launch - provide momentary brand exposure, freeing the UI to focus on content
- Placeholder UI - for apps that have very short load times, or don’t have a strong branding need
You can read more about these here.
Now I’ll show you how to make a branded launch screen, and how to use this opportunity to carry out your background tasks.
Branded Launch Screen
Create a new Blank Activity named LaunchScreenActivity and set this to be the Launch Activity. Check the AndroidManifest.xml and it should be like this:
…
           <category android:name="android.intent.category.LAUNCHER" />
       </intent-filter>
   </activity>
…
Layout
This is where we’ll design our actual launch screen. This could entirely be an image, or you could do the layout using Android’s native XML as well. For this demo, I’ll simply use a nice Material Design wallpaper of my choice, followed by a centered title.
Here’s the layout structure for reference:
<FrameLayout
    android:layout_width="match_parent"
    android:layout_height="match_parent"
    android:background="@color/blue_grey" >

      <ImageView
        android:layout_width="match_parent"
        android:layout_height="match_parent"
        android:background="@drawable/splash_img" />

    <LinearLayout
        android:layout_width="match_parent"
        android:layout_height="wrap_content"
        android:layout_gravity="center"
        android:orientation="vertical">

        <TextView
            android:text="Material Design" />

        <TextView
            android:text="Sample App" />
    </LinearLayout>

</FrameLayout>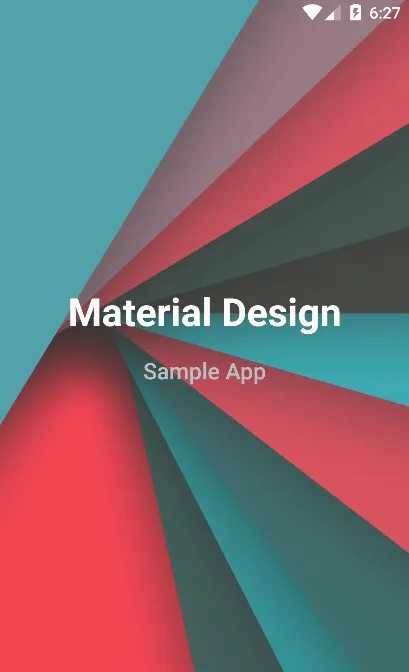
layout.xml preview
Once you’re done making your awesome launch screen, head over to your Activity.
Launch Screen Activity
Remember I mentioned about carrying out a background task while displaying the launch screen to users? This is where we’re going to do that.
public class LaunchScreenActivity extends AppCompatActivity {

    @Override
    protected void onCreate(Bundle savedInstanceState) {
        ...
        new BackgroundTask().execute();
        ...
    }
Note the BackgroundTask(). This is an AsyncTask which you will use to carry out your background tasks. However, I will simply use a timer, which upon a 3 second completion will go to your app’s home activity.
Background AsyncTask
private class BackgroundTask extends AsyncTask {
        Intent intent;

        @Override
        protected void onPreExecute() {
            super.onPreExecute();

            intent = new Intent(LaunchScreenActivity.this, MainActivity.class);
        }

        @Override
        protected Object doInBackground(Object[] params) {

            /*  Use this method to load background
            * data that your app needs. */

            try {
                Thread.sleep(SPLASH_TIME);
            } catch (InterruptedException e) {
                e.printStackTrace();
            }

            return null;
        }

        @Override
        protected void onPostExecute(Object o) {
            super.onPostExecute(o);
//            Pass your loaded data here using Intent

//            intent.putExtra("data_key", "");
            startActivity(intent);
            finish();
        }
    }
Note the 3 methods here. The onPreExecute() must be used for initialization. To prepare whatever you need to carry out your task. The doInBackground() is where the actual background task will be carried out. The meat of the task happens here. Finally, use the onPostExecute() method to carry out whatever needs to be done AFTER our task is complete.
In our case, we will use onPostExecute to send the user to our app’s home screen (Activity). Use this chance to pass the fetched data via an Intent.
Yep, that’s pretty much it! However do note that in my case, I am simply using a 3 second timer, which upon expiring takes the user to the home screen. You should do something more useful here.
Also, if your background tasks may take longer to execute, consider adding a ProgressBar or Spinner to indicate some sort of progress to the user. Otherwise they may be staring at your launch screen for quite a while not knowing what’s going on. Visual feedback is important!
Anyway, here’s the demo.
As always, here a link to GitHub for code sample.
A launch screen is a recent addition in Google’s Material Design arsenal for Android apps. While its certainly not new, with major app brands doing this for a long time. Only now do we have some official confirmation about this being a valid design pattern.
While my two minute launch screen design is far from amazing, it only serves the purpose of a demo. I believe you could come up with something much better. Drop ‘em in the comments below!