Design App Mockups with Adobe Illustrator & InVision
Designing app mockups allow us to quickly visualize how our app might ultimately look like. In this article tutorial, let’s learn how to do this really quick with Adobe Illustrator and InVision. I will also tell you the benefits of doing this and guide you every step of the way.
While I say this blog is about Android app development and design, my series of recent posts were hardly anything about the latter. Adobe Illustrator along with InVision are two powerful tools when used together.
Before we jump ahead to the softwares, let’s discuss about why we need app mockups in the first place?
Why Design App Mockups?
To develop any app, what is required first is a visual idea of the end product. A mockup. Note that although this article talks about app mockups. You could do static mockups for any digital product/software.
So why do a mockup when you could spend that time building the actual thing? Good question.
A mockup, is a model of a design, used for demonstration and design evaluation. It is used by designers mainly to acquire feedback from users. Mock-ups address the idea captured in a popular engineering one-liner: You can fix it now on the drafting board with an eraser or you can fix it later on the construction site with a sledge hammer. – Wikipedia
Note the last line quoted above. It implies that making corrections early on is easier and less costly, rather than having to rework on your actual designs later on into development. Long story short, you save time and frustration, if you pay attention to things now.
Also, if you didn’t understand any of that, a mockup is simply a static image design of what an app screen will exactly look like. Here’s an example of a app mockup that I made.
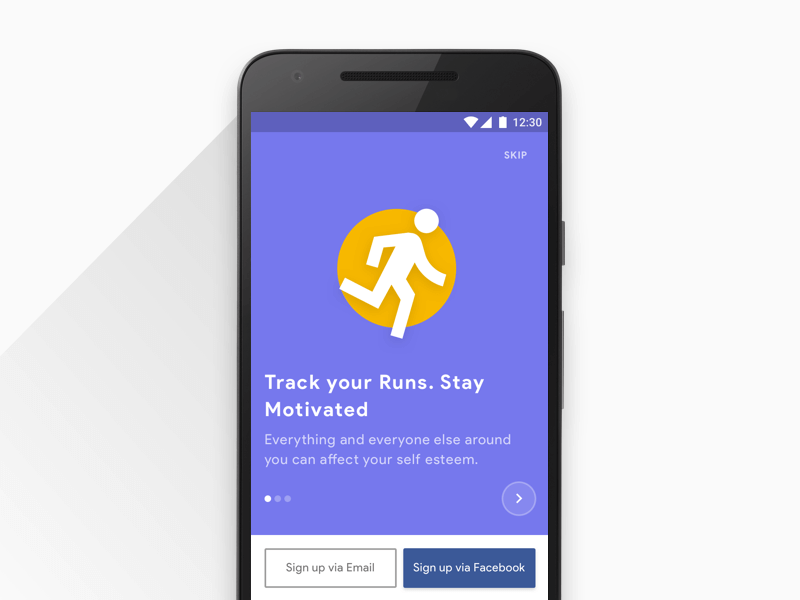
Onboarding App Mockup – Dribbble
Getting to know the tools
Now that we’re clear on what an app mockup actually is, let’s look at the tools we need.
As I’ve previously mentioned above, the two software that we’re going to use are:
- Adobe Illustrator
- InVision App
Adobe Illustrator
A professional software for graphic design. It specializes in Vector Graphics and is the industry standard.
If you don’t have the software, you can grab a free-trial of Adobe Illustrator CC 2018.
Yeah, I know that today there’s a better tool out there *cough* Sketch *cough* that’s more well-suited (and fancy). Maybe I’ll cover that in another tutorial, but for now, let’s focus on Illustrator.
Once you have Illustrator set up, keep in mind that it is a fairly complex software. But I will show you how to use it easily and design app mockups fast!
Just to note, you do not require extensive knowledge of Illustrator. But I do recommend a getting started video at the LEAST just to familiarize yourself with the workflow. However, not to be alarmed as we’ll just be doing simple drag and drop.
If you’re interested in learning Adobe Illustrator, I’d suggest you check out this course by Udemy. It provides free Adobe Illustrator classes.
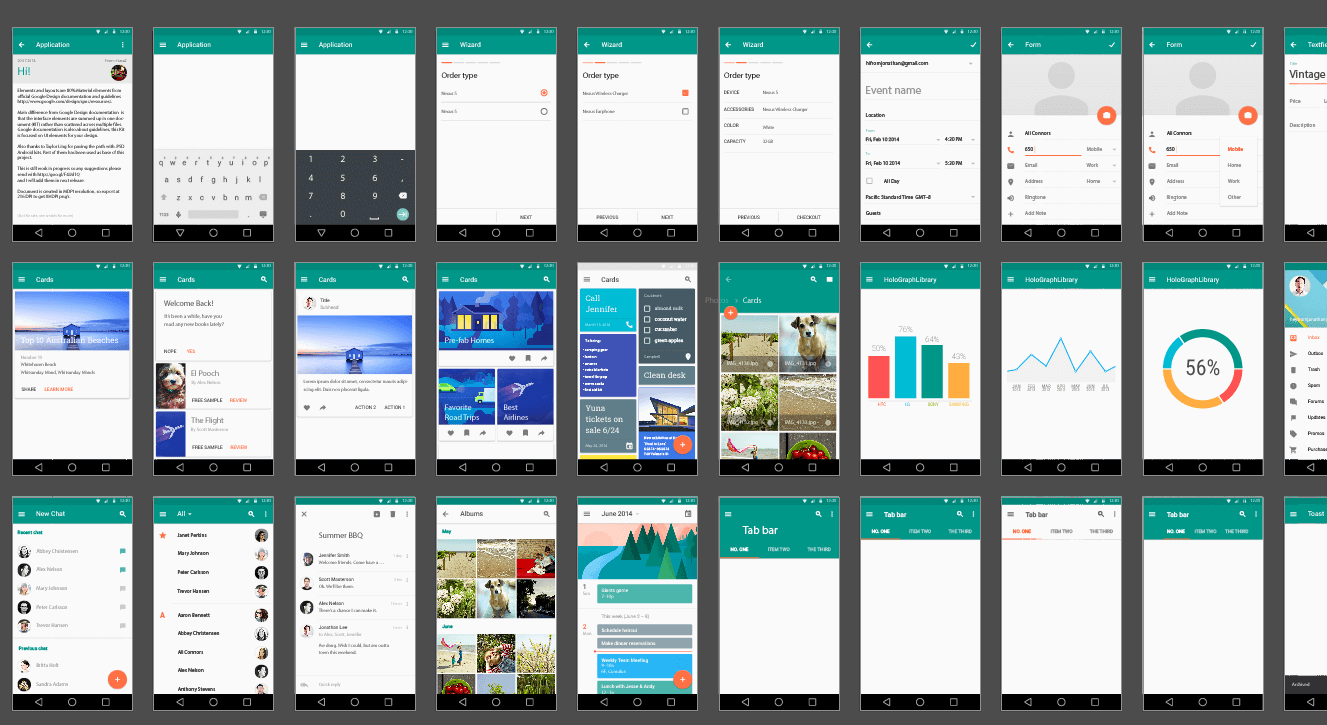
UI Kits to design app mockups, faster
There are many available resources to accelerate our workflow such as UI kits specifically for mobile, be it Android or iOS. I’ll be using a free UI Kit for Google Material Design. I strongly suggest you use one so you can simply drag and drop UI components instead of designing them from scratch.
Grab the UI kit here.
Exploring the Material Design UI Kit
Once you’ve downloaded the UI kit, let’s take a look at what it has to offer.
Inside the UI kit you downloaded, there will be 3 files under the ‘master‘ folder:
- the actual kit
- the individual UI elements
- Typography styles
You can notice the UI kit is quite exhaustive, and that’s only half of what I could screenshot. As a bonus, the ‘resources’ folder also includes the entire ‘Roboto’ font and the complete Material Design color palette. Neat!
InVision App
InVision is free to start so go ahead and sign up!
We will be using InVision to finally put together our mockups and bring our prototype to life. But more on that later.
Designing App Mockups with Adobe Illustrator
I will suggest using Adobe Illustrator for mockups. Now many of you may say why not Adobe Photoshop, but read this discussion on DesignerNews as to why Illustrator is better suited for UI design.
Now, let’s get down to actually designing our app mockup screens.
Document & Grid Setup
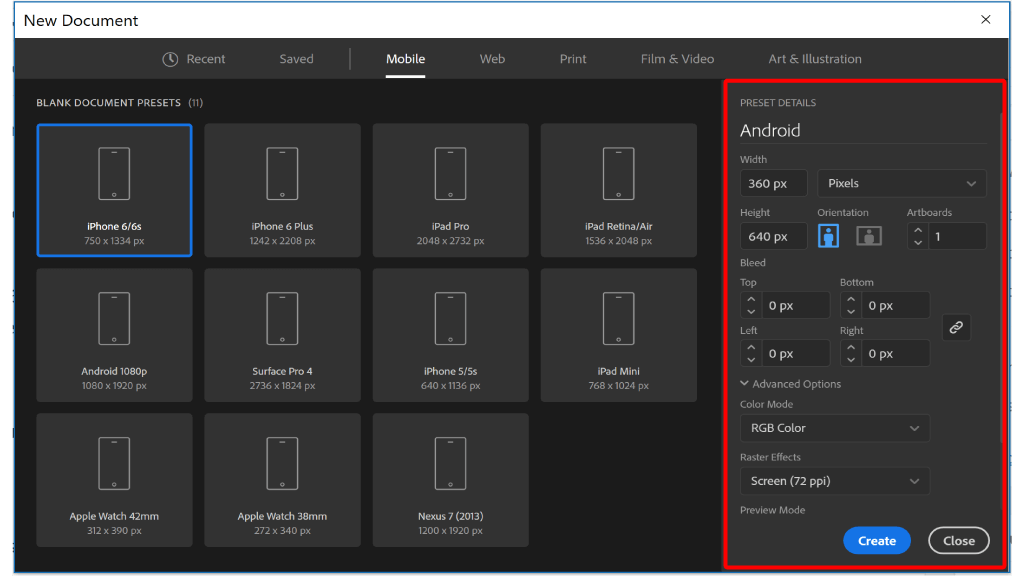
Start by creating a New Document in Adobe Illustrator. We won’t be going with a preset but rather creating one of our own.
So use the following settings to create a new document.
- Width: 360 px
- Height: 640 px
- Advanced> Raster Effects: Screen (72 ppi)
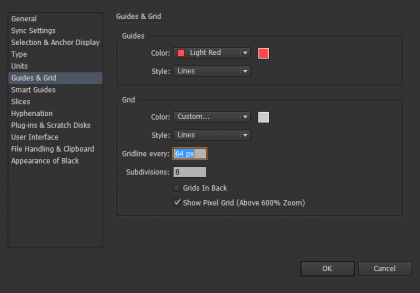
 Now we’ll setup a grid for our work, so our elements can align perfectly. Go to Edit > Preferences > Guides & Grid
- Gridline every: 64 px
- Subdivisions: 8
Don’t fret seeing this as a troublesome process. You can save this as a template so you can jump start your work from the next time.
Process
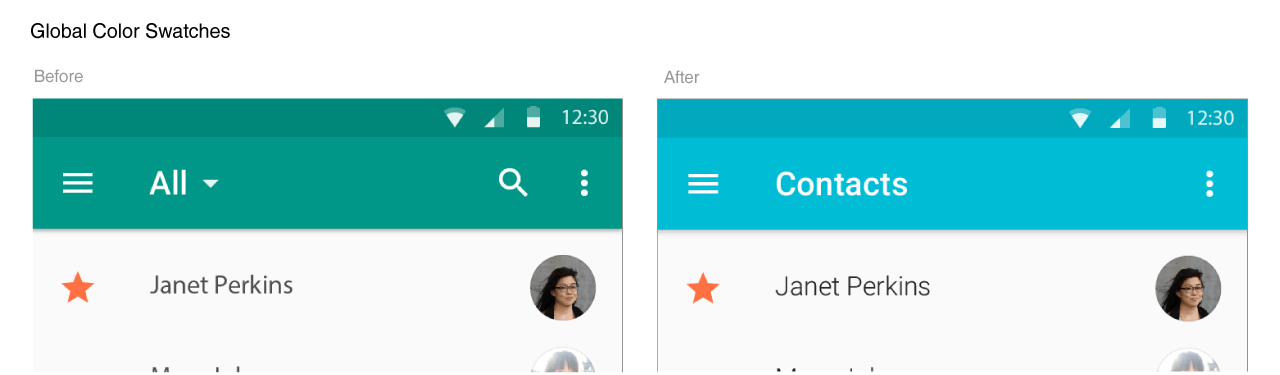
Create two new Global Color Swatches in your color palette, one named ‘primary‘ and the other ‘accent‘.
Those familiar with how color works in Material Design should instantly be able to recognize what I just did there. As the name goes, those two are primary and accent colors that will be global to our app design. In other words, those are our brand colors. One primary and one secondary. We do this so that we can swap out the default colors with our brand colors in the Material Design UI kit.
Helpful Reading: Color Psychology – What do different colors mean?
Now open the UI Kit files that you just downloaded. Drag and drop whatever components you need to swiftly build your app mockups. The beauty here is, when you drag and drop the desired elements onto your Artboard, you will be asked whether to ‘Merge Swatches‘. Hit that option and watch as the objects take on your document’s primary and accent colors. Great!
From now on the process is the same, rinse and repeat. Drag your required elements from your UI kit over to your document
Metrics
The width of each grid column is 8px. This is the baseline grid used in Material Design metrics for design. So if you plan on making a FAB (Floating Action Button– see below), that would be 56 px (8 x 7 ). While the guidelines mention in dp (for apps), you can continue to use px in your designs. So if you see, the grid helps us scale well. The UI kit would have elements in the right dimensions anyway.
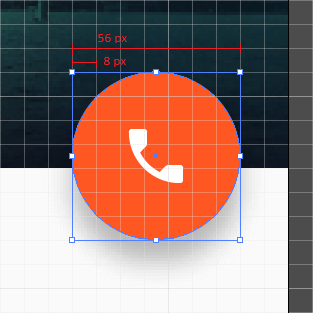
Floating Action Button adhering to an 8-point baseline grid
Final Results – Output
Now once you’re done with your screens, save them via File > Save for Web. Now its called ‘Save for Web’ for a reason so I strongly suggest you use this option. You can save as either a JPEG or PNG. Deliberately save at medium quality so your mockups will load fast on a browser. Alternately you can scale it at a decent 1280×720 and save but I’d caution against pushing further than that.
[su_custom_gallery source=”media: 778,779,780″ limit=”3″ link=”lightbox” width=”180″ height=”320″]
App Structure
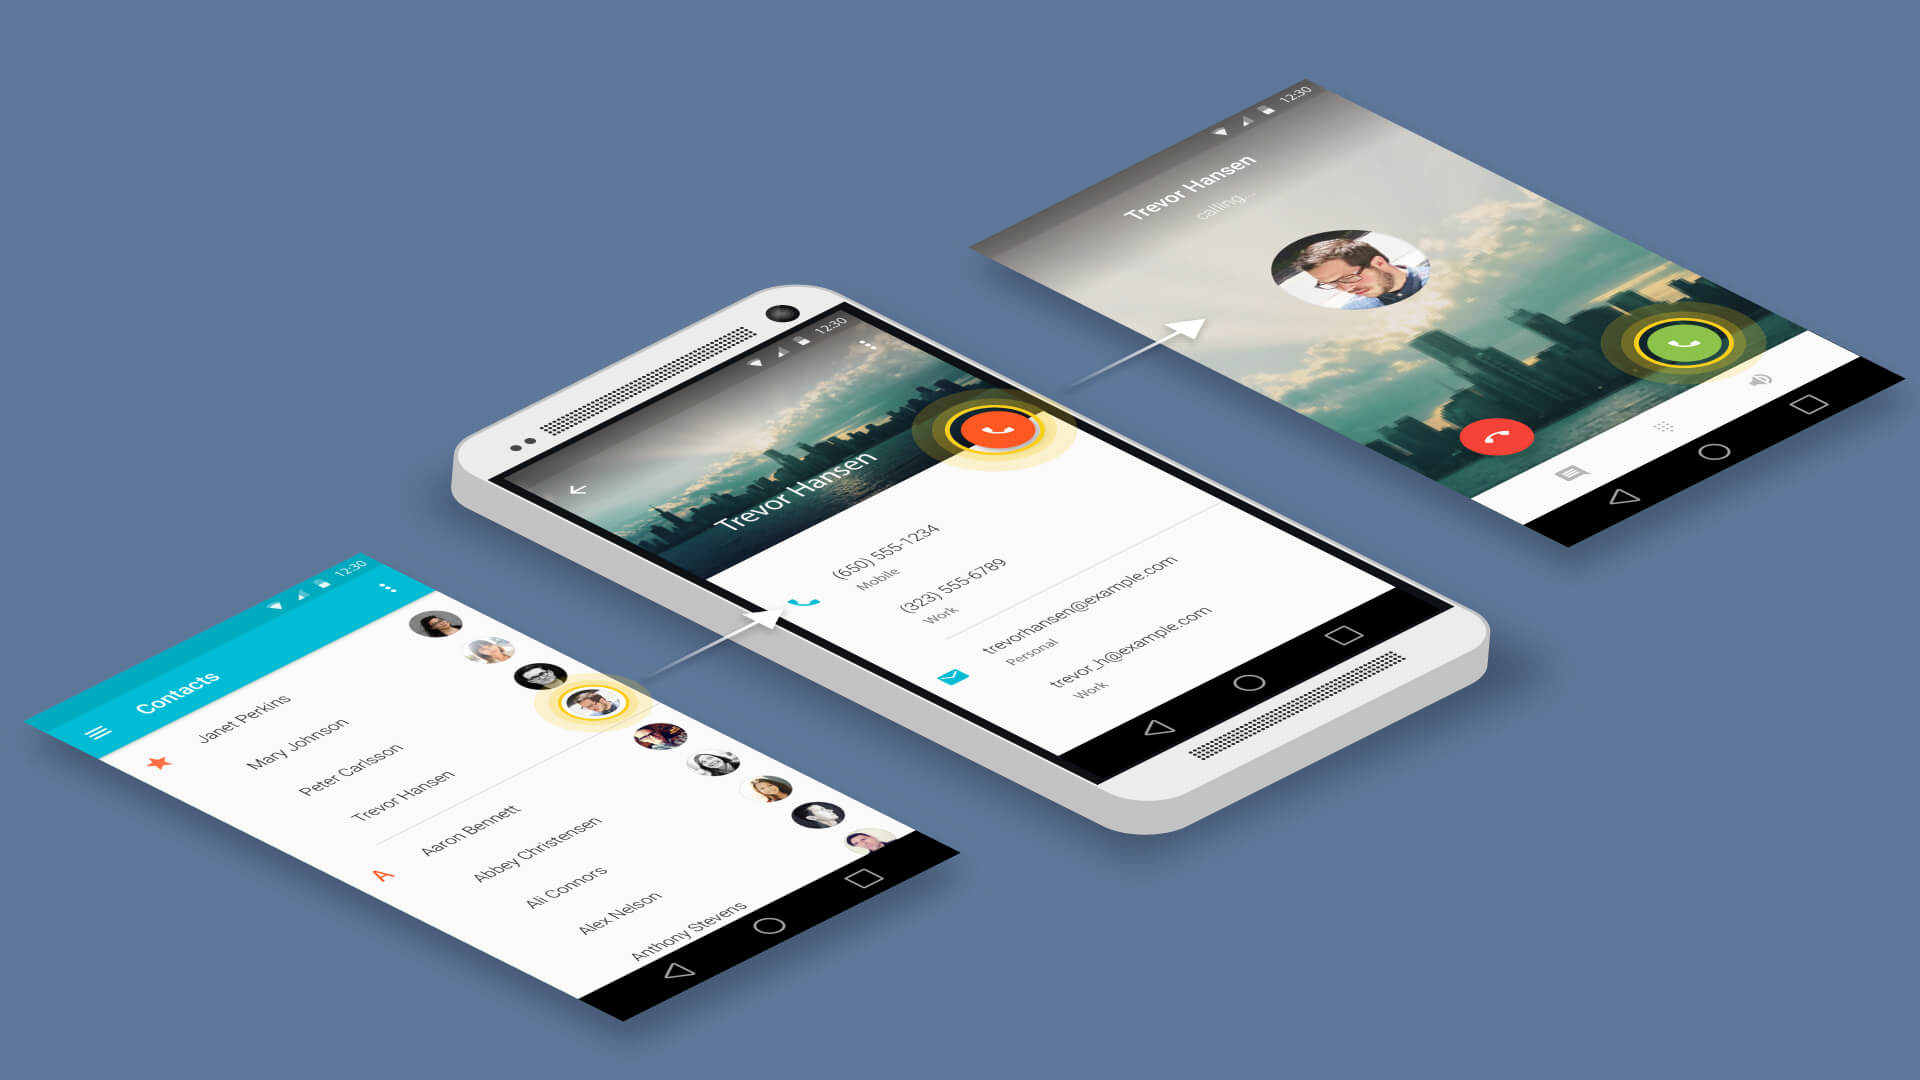
Now that we have all our screens together, the purpose of a mockup is to mimic a ‘feel’ of the end product. I know its not the real thing, but it should be close enough.
So to mimic that realism we need to have a screen flow to logically show how our app will behave and navigate upon certain action. Now keep in mind that being a mockup, focus on the primary actions first. So for my caller app, I’m going to focus on this simple screen flow.
Home screen (Contact List) -> Contact profile screen -> Calling screen
Yes, I know an app consists of more, but this is just a demo and if you see, I’ve already covered the prime aspects. We don’t care about a settings page right now. The purpose of my calling app is to view my contacts, view details about a specific contact and finally be able to call that contact.
You might want to take a breather here. We’re only half way through 😉
[su_row]
[su_column size=”1/3″]

Buy the Book
[/su_column]
[su_column size=”2/3″]
Anyone can design a user interface, but if you’re interested in designing one that is effective and converts your users better, I suggest you read ‘UI is Communication – ‘. A brilliant book that teaches how to communicate with your users, through your UI.
[/su_column]
[/su_row]
Putting it together with InVision
To do what I’ve mentioned above, we’ll use a web app called InVision. I happened to take part in a Startup Weekend challenge last year where I happened to learn about this beauty.
InVision an online tool that allows us to put together our screens, define clickable regions that navigate to other screens. It helps sculpt our app navigation flow.
As a bonus we got animation on click effects and they even wrap our designs neatly in a phone so when we look at it, its like looking at the real thing! Now InVision has a pricing plan, but upto one project it is free. I find this fair enough, because unlike other prototyping tools I’ve used, most of my time is spent up in trying to learn the tool or worrying about limitations on the free version. At least I don’t have to bother about that with InVision. I can simply design my screens using any of my favorite graphic software, then upload to InVision and arrange them. Simple and intuitive.
How it Works
Start by signing into InVision (or creating an account). I’m actually surprised as how much InVision has changed over the year. They support Dropbox and Drive, even let you upload various image formats, including direct PSD files. But I am using JPG.
Setup
Create a new project for Android Phone in Portrait. Then add in all your screens. Just make sure their named well enough for you to identify (if you’re handling many).
The dashboard might take a little time getting used to, but trust me its easy. Simply tap the screen you want to start with and you’re off. Start by going to Build Mode(B).Here’s where most of work will happen. From now on, what we’ll be doing is three steps repeatedly.
The 3 Step Process:
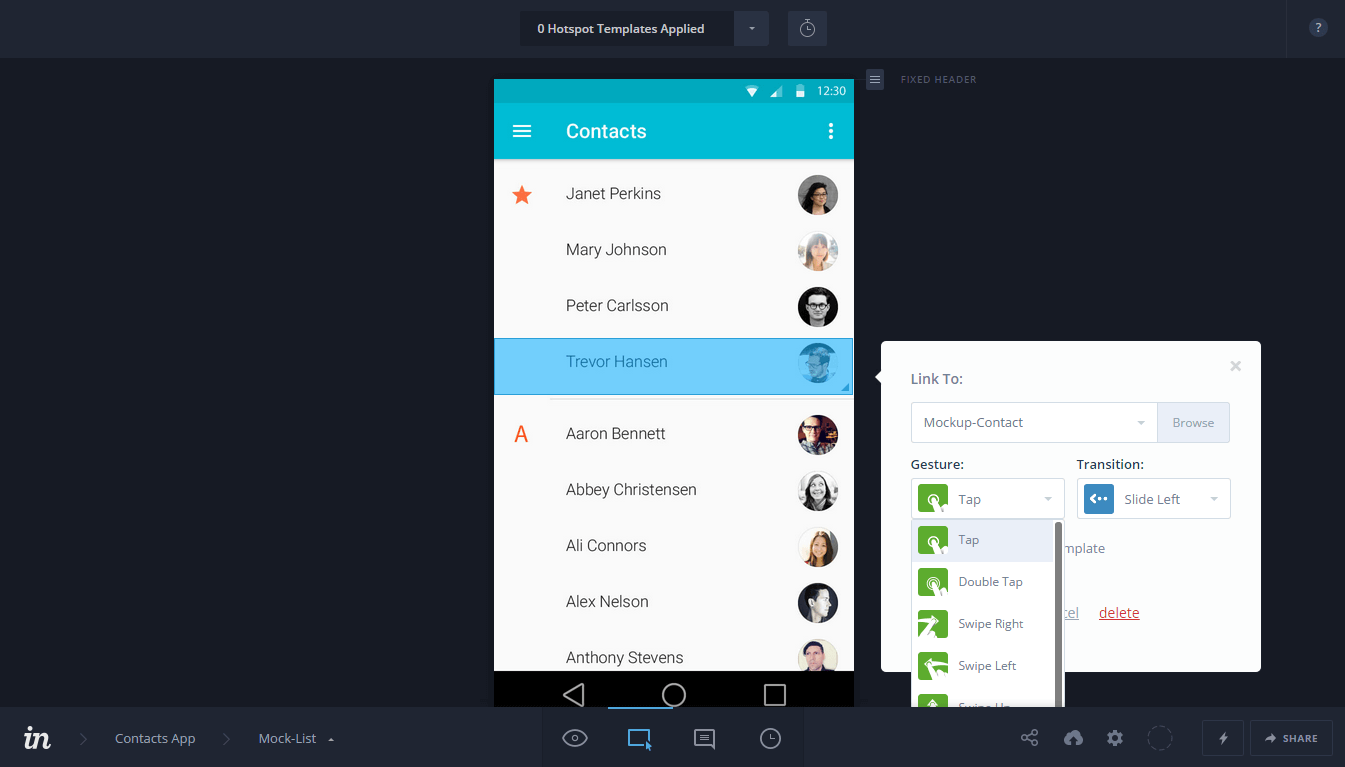
- Define your clickable regions (Hotspots)
- Select a destination screen
- Choose a transition effect to go with it
That’s all there is to it! Rinse repeat these 3 steps for all your screen controls. Don’t forget to include back navigation at the bottom. Selecting a transition will add a more realistic feel for the app. Also note that you can optionally chose a different gesture apart from a tap, which includes swiping, double taps and more.
Final Mockup
So here it is! The final app mockup. Personally to me, it looks great. I’ve wrapped it in a white Galaxy S4, hidden the status bar as well (accessible via the gear icon below), and the app navigates as it should.
[su_youtube url=”https://youtu.be/cB2109NPWgY”]
Now I don’t know who you are Trevor, but thank you for gracing my design.
Advantages
Now that we’re done. Let me tell you WHY I chose to do my mockups this way. Well, I can use a software of my choice for design, one that I’m comfortable with. I’m able to design faster as a result of that. InVision is a powerful tool because it:
[su_row]
[su_column size=”1/2″]
- can sync from the cloud
- accepts various image formats (PSD & Sketch too!)
- can collaborate with other teammates
- can help receive real-time feedback on designs
- has a intuitive preview tool that looks great
- can be shared with others via a simple link
- can view design on an actual smartphone (via link)
[/su_column]
[su_column size=”1/2″]

[/su_column]
[/su_row]
Finally we’re done with this long post. I see design as creative work that must be enjoyed. We’ve been introduced to two great tools: Illustrator and InVision, which help us create designs with great flexibility and put them together as a working prototype respectively. With InVision you can take it a step further, update your designs on the fly, add team members to collaborate as well.
Both are powerful tools to help ease your design process. So if you’re still struggling in code for initial design showcases, ditch that and get started here!


You cannot import files created in illustrator directly to invision?
As far as I’m aware, you cannot do that directly. But you can after you export all your artboards to JPG/PNG. However, Sketch offers that functionality and is a better tool for UI design than Adobe Illustrator.