RecyclerView Adapter in Android, made Fast and Easy

Every time we think of creating a RecyclerView, we dread the amount of code that must go into the adapter. Also, if that adapter has many ViewHolders, then god save us!
Also, I haven’t even mentioned click listeners, drag and drop and other fancy stuff. If you’ve freaked out already about the effort needed for all that, then this post is for you.
Of course, we all are familiar with the RecyclerView.Adapter boilerplate code. But writing the same code setup again and again is a waste of time.
Surely there must be a better way?
Say hello to FastAdapter!
The bullet proof, fast and easy to use adapter library, which minimizes developing time to a fraction… – Mike Penz
FastAdapter is made by Mike Penz. The developer of popular libraries such as MaterialDrawer and AboutLibraries.
FastAdapter reduces your time spent on Adapter code. Moreover, it offers a lot of features so it wouldn’t limit your app in any way. With tons of features offered, consider replacing your ‘regular’ RecyclerView Adapters with FastAdapter.
Click listeners, Multi-selection, filtering, drag and drop, headers and much more. You name it, you got it!
Getting Started
Start using FastAdapter by adding the following dependencies:
compile('com.mikepenz:fastadapter:1.5.2@aar') {
        transitive = true
    }
compile 'com.mikepenz:fastadapter-extensions:1.5.1@aar'
Creating the Model class
Let’s say we’re creating an app about the types of Mango (which happens to be my favourite fruit). So I name my model class simply, Mango.
public class Mango {

    private String name, description, imageUrl;

    public Mango() { }

    public Mango(String name, String description, String imageUrl) {
        this.name = name;
        this.description = description;
        this.imageUrl = imageUrl;
    }

    // Your variable Getter Setters here
}
Implementing the Adapter
FastAdapter makes use of your model class to create the RecyclerView.Adapter and RecyclerView.ViewHolder.
Extend your model with AbstractItem<Item, Item.ViewHolder> and implement its methods:
getType()– return a unique ID (of your parent layout)getLayoutRes()– return your XML layout resourcebindView()– RecyclerView’sonBindViewHolder()method
public class Mango extends AbstractItem<Mango, Mango.ViewHolder> {

    private String name, imageUrl, description;

    public Mango() { }

    public Mango(String name, String imageUrl) {
        this.name = name;
        this.imageUrl = imageUrl;
    }

     // Your Getter Setters here

    // Fast Adapter methods
    @Override
    public int getType() { return R.id.item_card; }

    @Override
    public int getLayoutRes() { return R.layout.list_item; }

    @Override
    public void bindView(ViewHolder holder) {
        super.bindView(holder);
    }

    // Manually create the ViewHolder class
    protected static class ViewHolder extends RecyclerView.ViewHolder {

        //TODO: Declare your UI widgets here

        public ViewHolder(View itemView) {
            super(itemView);
            //TODO: init UI
        }
    }
}
[su_row][su_column size=”1/2″]
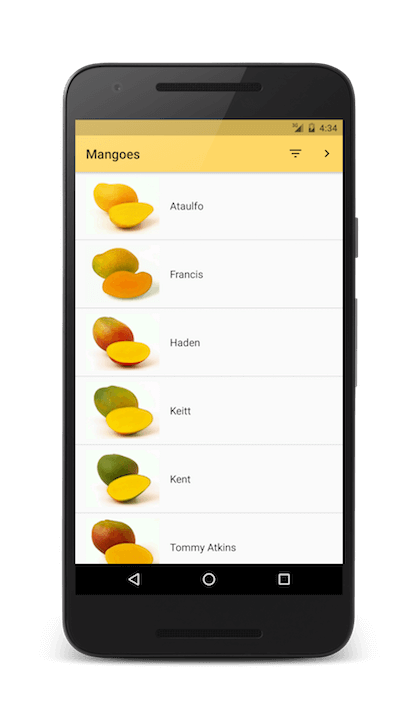
Simple List using FastAdapter
[/su_column] [su_column size=”1/2″]
Marrying FastAdapter to RecyclerView
With that in place, you can finally attach FastAdapter to your RecyclerView:
recyclerView.setLayoutManager(new LinearLayoutManager(context, LinearLayoutManager.VERTICAL, false));

FastItemAdapter<Mango> fastAdapter = new FastItemAdapter<>();
recyclerView.setAdapter(fastAdapter);

// Fetch your data here
List<Mango> mangoes = loadMangoes();

fastAdapter.add(mangoes);
That is all we need to do! If we run our app now, we’d get a RecyclerView populated with a list of mangoes.
So instead of reviewing what we just did. Let’s what what we did NOT do for our adapter:
- create an exclusive class for
RecyclerView.Adapter - inflate an item layout
- bother with
getItemCount()
[/su_column] [/su_row]
So I’m sure you’ll believe me now. FastAdapter did quick work of creating a list. But surely you want to do more than just display a list? Here is where FastAdapter shines.
Feature List
Let’s see how some popular RecyclerView features are done with FastAdapter. Use the below index to navigate.
- Click listener
- Filtering data with Search
- Drag and drop
- Multi-select with CAB (Contextual Action Bar) and Undo action
- Adding Header view (multiple ViewHolders)
- Infinite (endless) scrolling
1. Click Listener
Enable withSelectable for FastAdapter, and then set its click listener.
fastAdapter.withSelectable(true);

fastAdapter.withOnClickListener(new FastAdapter.OnClickListener<Mango>() {
            @Override
            public boolean onClick(View v, IAdapter<Mango> adapter, Mango item, int position) {
               // Handle click here
                return true;
            }
        });
2. Filtering data with Search
If our app uses a SearchView, and we want to filter our adapter data based on its results. FastAdapter has provision for that too.
// Call this in your Search listener
fastAdapter.filter("yourSearchTerm");

fastAdapter.withFilterPredicate(new IItemAdapter.Predicate<Mango>() {
            @Override
            public boolean filter(Mango item, CharSequence constraint) {
                return item.getName().startsWith(String.valueOf(constraint));
            }
});
Note the filter(Mango item, CharSequence constraint) method. Return true means remove those items from the adapter, and retain those items which return false.
If you’re using SearchView, call filter() in its onQueryTextSubmit(String s) and onQueryTextChange(String s) methods.
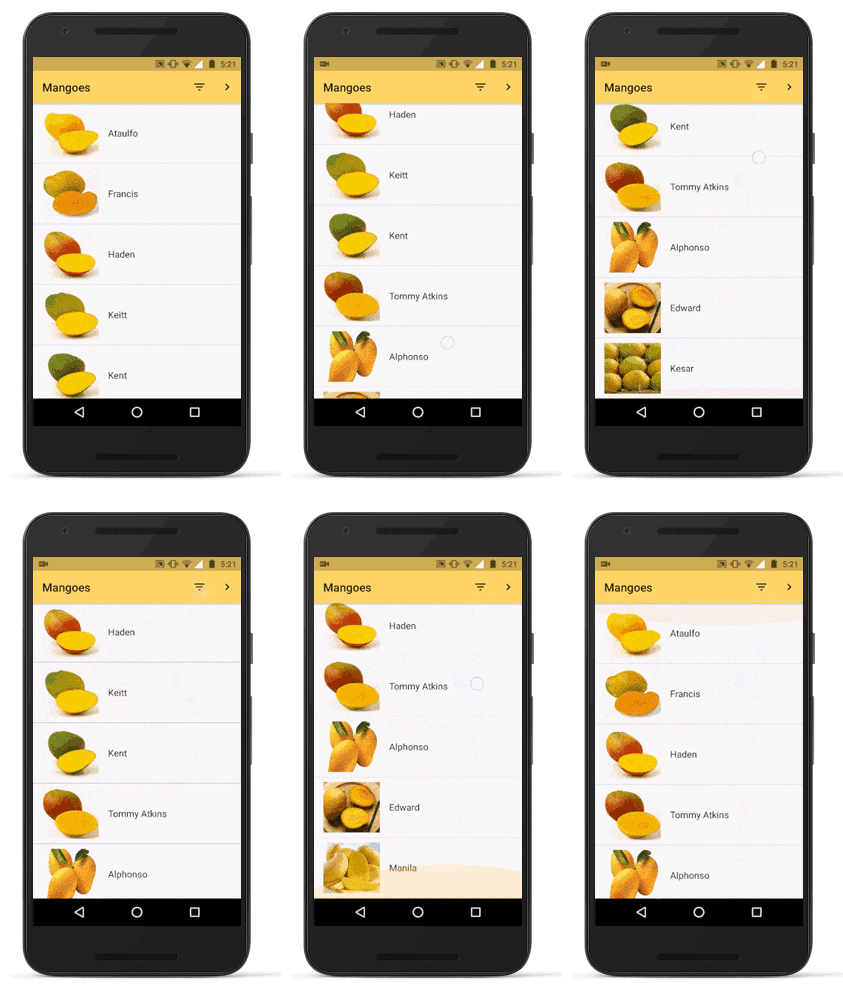
3. Drag and Drop
Start by creating an instance of SimpleDragCallback (courtesy of FastAdapter). Next, use it to initialize an ItemTouchHelper. Finally attach the ItemTouchHelper to RecyclerView.
SimpleDragCallback dragCallback = new SimpleDragCallback(this);
ItemTouchHelper touchHelper = new ItemTouchHelper(dragCallback);
touchHelper.attachToRecyclerView(recyclerView);
Implement the ItemTouchCallback interface in your Activity. It implements the itemTouchOnMove() method. Add the following code to it.
@Override
   public boolean itemTouchOnMove(int oldPosition, int newPosition) {
       Collections.swap(fastAdapter.getAdapterItems(), oldPosition, newPosition); // change position
       fastAdapter.notifyAdapterItemMoved(oldPosition, newPosition);
       return true;
   }
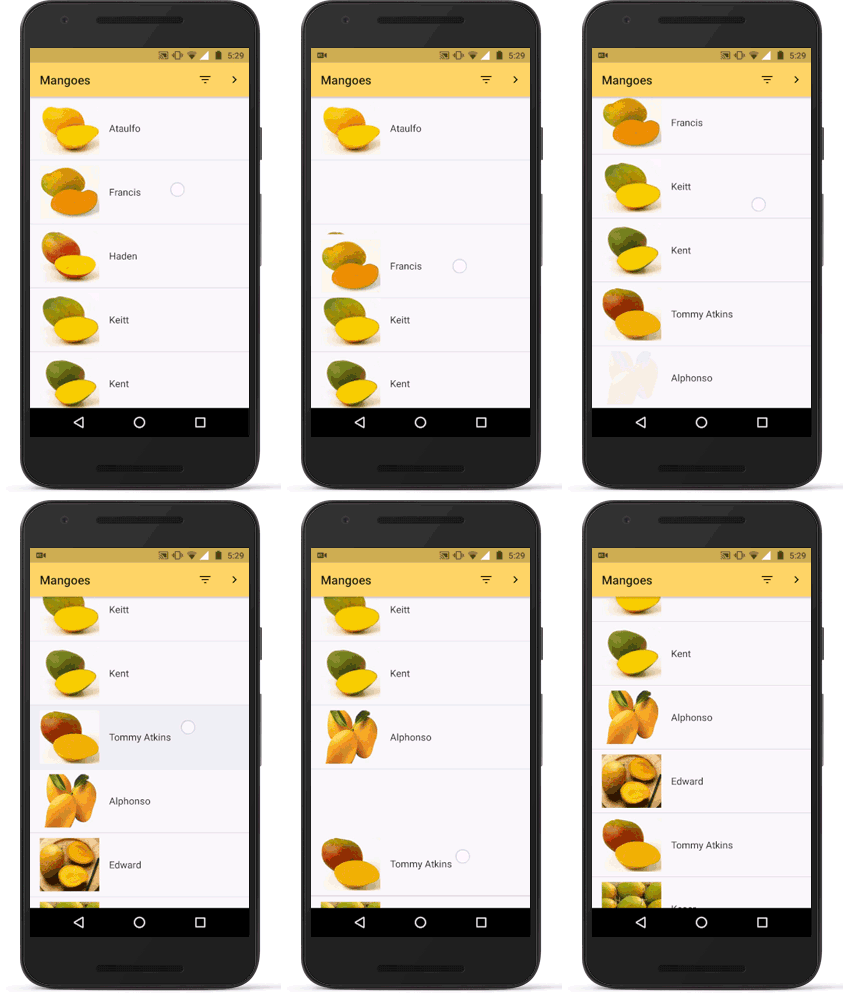
FastAdapter with Drag and Drop support
4. Multi-Select with CAB (Contextual Action Bar) and Undo action
Start by creating an inner class ActionBarCallBack for your Activity, and implement ActionMode.Callback.
private class ActionBarCallBack implements ActionMode.Callback {
        @Override
        public boolean onCreateActionMode(ActionMode mode, Menu menu) { return true; }

        @Override
        public boolean onPrepareActionMode(ActionMode mode, Menu menu) { return false; }

        @Override
        public boolean onActionItemClicked(ActionMode mode, MenuItem item) {
            mode.finish();
            return true;
        }

        @Override
        public void onDestroyActionMode(ActionMode mode) { }
    }
Initialize an ActionModeHelper (by FastAdapter).
fastAdapter.setHasStableIds(true);
fastAdapter.withSelectable(true);
fastAdapter.withMultiSelect(true);
fastAdapter.withSelectOnLongClick(true);

actionModeHelper = new ActionModeHelper(fastAdapter, R.menu.cab, new ActionBarCallBack());
Regular onClick methods are used for other actions, such as for detail navigation. Hence FastAdapter provides a preClick and preLongClick listener for handling CAB.
fastAdapter.withOnPreClickListener(new FastAdapter.OnClickListener<Mango>() {
            @Override
            public boolean onClick(View v, IAdapter<Mango> adapter, Mango item, int position) {
                Boolean res = actionModeHelper.onClick(item);
                return res != null ? res : false;
            }
});

fastAdapter.withOnPreLongClickListener(new FastAdapter.OnLongClickListener<Mango>() {
            @Override
            public boolean onLongClick(View v, IAdapter<Mango> adapter, Mango item, int position) {
                ActionMode actionMode = actionModeHelper.onLongClick(MainActivity.this, position);
                if (actionMode != null) {
                    // Set CAB background color
                   findViewById(R.id.action_mode_bar).setBackgroundColor(Color.GRAY);
                }
                return actionMode != null;
            }
});
Note that we do not consume preClick if Action Mode is not enabled. If that’s the case, we return false. This allows us the regular onClick method to be handled. If you’re also using withOnClickListener(), don’t forget to return false.
Lastly, enable windowActionModeOverlay in your AppTheme, found in values/styles.xml.
<item name="windowActionModeOverlay">true</item>
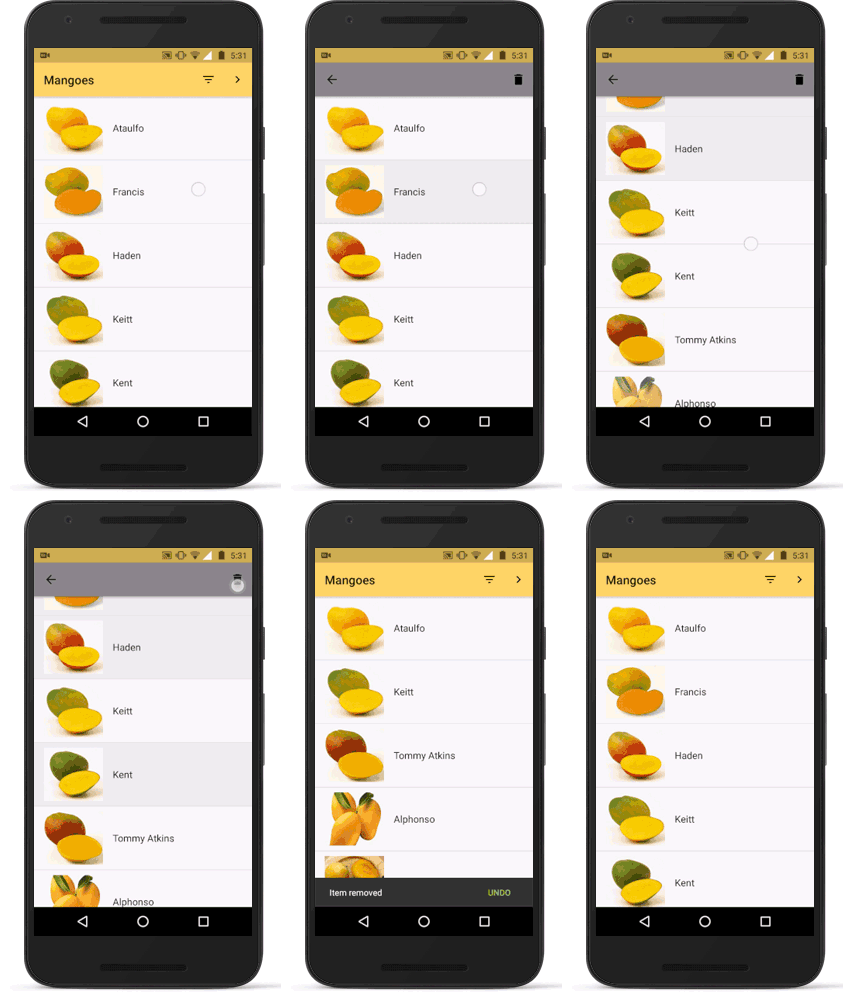
Multi-select and CAB (Contextual Action Bar)
Undo Action
Deleting multi-selection items in CAB mode, works in conjunction with UndoHelper. This helper class will allow us to perform deletion on the multi-selected items.
UndoHelper undoHelper = new UndoHelper(fastAdapter, new UndoHelper.UndoListener<Mango>() {
            @Override
            public void commitRemove(Set<Integer> positions, ArrayList<FastAdapter.RelativeInfo<Mango>> removed) {
                Log.d("remove", "removed: " + removed.size());
            }
        });
For this interface implementation, we log the removed items count. UndoHelper.UndoListener is also useful to know the positions of the removed items.
Remember the inner class ActionBarCallBack that we created? Modify its onActionItemClicked() method to this:
@Override
public boolean onActionItemClicked(ActionMode mode, MenuItem item) {
    undoHelper.remove(findViewById(android.R.id.content), "Item removed", "Undo", Snackbar.LENGTH_LONG, fastAdapter.getSelections());
    mode.finish();
    return true;
}
We have just called the UndoHelper’s remove() method. This essentially removes the multi-selected items. Upon removal, it displays a SnackBar notifying us on success. It also gives us a prompt to undo the last removal, if we want to.
5. Adding Header View (multiple ViewHolders)
You could modify the existing Mango model for this. But for the sake of code cleanliness, let’s maintain a new model class for our Header view.
public class Header extends AbstractItem<Header, Header.ViewHolder> {

    String title;

    public Header(String title) {
        this.title = title;
    }

     // Your getter setters here

    // AbstractItem methods
    @Override
    public int getType() {
        return R.id.header_text;
    }

    @Override
    public int getLayoutRes() {
        return R.layout.header_item;
    }

    @Override
    public void bindView(ViewHolder holder) {
        super.bindView(holder);

        holder.textView.setText(title);
    }

    protected static class ViewHolder extends RecyclerView.ViewHolder {
        @BindView(R.id.header_text) TextView textView;

        public ViewHolder(View itemView) {
            super(itemView);
            ButterKnife.bind(this, itemView);
        }
    }
}
Nothing fancy here. The Header model supports displaying a simple TextView.
Start by initializing your Adapter variables:
FastItemAdapter fastAdapter = new FastItemAdapter<>();
fastAdapter.setHasStableIds(true);
fastAdapter.withSelectable(true);

HeaderAdapter<Header> headerAdapter = new HeaderAdapter<>();
If you recall from earlier, we initialized our FastAdapter like this:
FastItemAdapter<Mango> fastAdapter = new FastItemAdapter<>();
Note that now, we don’t explicitly mention the type. This allows our FastAdapter to hold data from both Mango and Header models.
Alternatively, you can initialize a generic type FastAdapter:
FastItemAdapter<IItem> fastAdapter = new FastItemAdapter<>();
IItem is the base type for your Model classes. So if you initialize like this, remember to cast your models to IItem when adding data.
Setting the adapter
This is slightly different from last time. We set both, headerAdapter and fastAdapter to our RecyclerView using the wrap(FastAdapter) method.
recyclerView.setAdapter(headerAdapter.wrap(fastAdapter));
If you wish to have a third, different type of ViewHolder, its possible with an additional wrap() method.
recyclerView.setAdapter(thirdAdapter.wrap(headerAdapter.wrap(fastAdapter)));
Adding data
All data is added to FastAdapter. For this example, I want one Header view at the top, and another in the middle. In an ideal scenario, you will have different subsets of data with header titles for each of them.
So for my case, I add my data like this:
 int half = mangoes.size() / 2;

fastAdapter.add(0, new Header("First half").withIdentifier(1));
fastAdapter.add(1, mangoes.subList(0, half));
fastAdapter.add(half + 1, new Header("Second half").withIdentifier(2));
fastAdapter.add(half + 2, mangoes.subList(0, half));
I already have my list of mangoes. So I add half of them under the first header, and the other half under the second. The above code snippet demonstrates that.
Note the increments to the half integer. The position is incremented like you would for any List.
Manipulating with different ViewHolders
Our FastAdapter now supports and holds data of different View types. So how do we manipulate stuff? Like handle clicks, and all the fancy stuff mentioned above?
In short, the answer is to use instanceof.
As an example, I’ll show you how to modify FastAdapter’s click listener:
fastAdapter.withOnClickListener(new FastAdapter.OnClickListener<IItem>() {
            @Override
            public boolean onClick(View v, IAdapter<IItem> adapter, IItem item, int position) {

                if (item instanceof Mango) {
                   // Do your thing!
                } else if (item instanceof Header) {
                   // Header clicks usually don't do anything. Ignore if you like.
                }
                return true;
            }
});
Notice the difference here? When we did the same click listener earlier, the onClick() passed us a Mango item. But since FastAdapter now is generic, it passes us an IItem (base class) object.
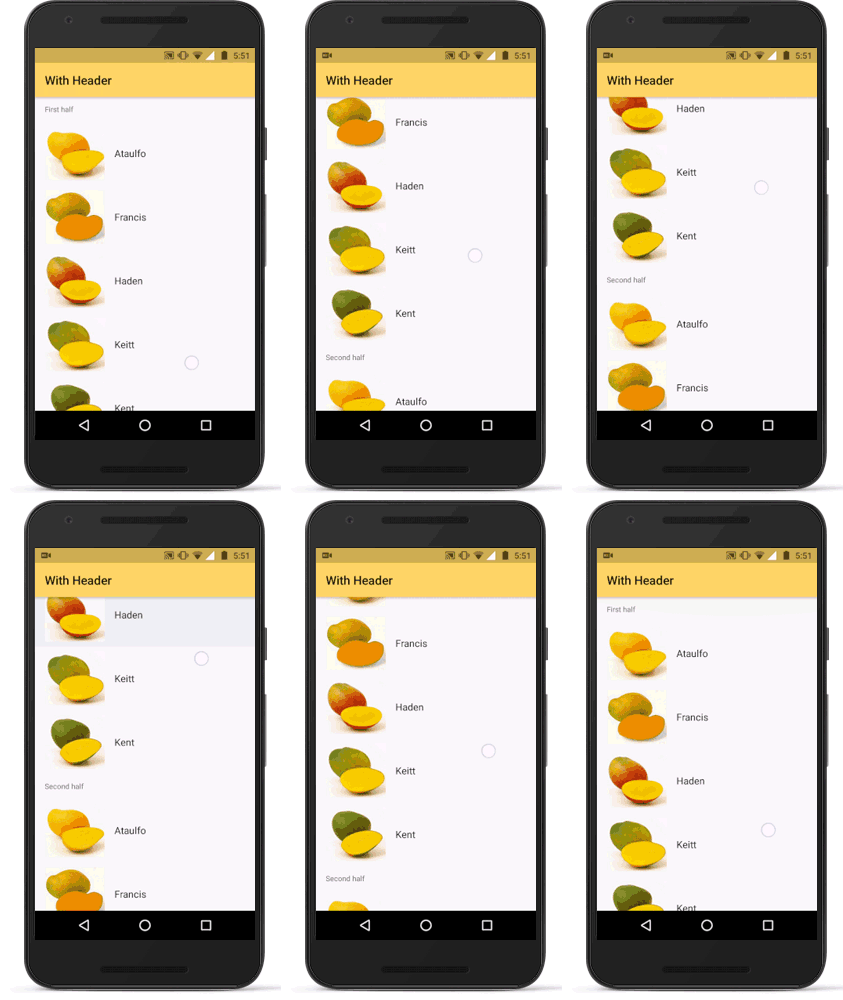
FastAdapter with multiple ViewHolders
6. Infinite (endless) scrolling
This feature is used by almost all social networking apps. They load N number of posts first. After you reach the end of it, they show a loading indicator and then load N more.
This is known as endless scrolling or pagination.
The key to doing this lies in RecyclerView’s addOnScrollListener() method. But we both know, inside the listener is where the real hardship is. For this, FastAdapter saves us with EndlessRecyclerOnScrollListener().
First, let us create a FooterAdapter. We need this to display a loading ProgressBar at the end of our list.
FooterAdapter<ProgressItem> footerAdapter = new FooterAdapter<>();
Note that ProgressItem is provided by FastAdapter’s extensions. It is not part of the core library. So let’s safely use both core and extension libraries shall we? After all, they are very useful!
recyclerView.addOnScrollListener(new EndlessRecyclerOnScrollListener() {
            @Override
            public void onLoadMore(int currentPage) {
                footerAdapter.clear();
                footerAdapter.add(new ProgressItem().withEnabled(false));

                // Load your items here and add it to FastAdapter
                fastAdapter.add(newMangoes);
            }
});
Really, that’s all there is to do infinite scrolling. It’s that easy! See the results for yourself.
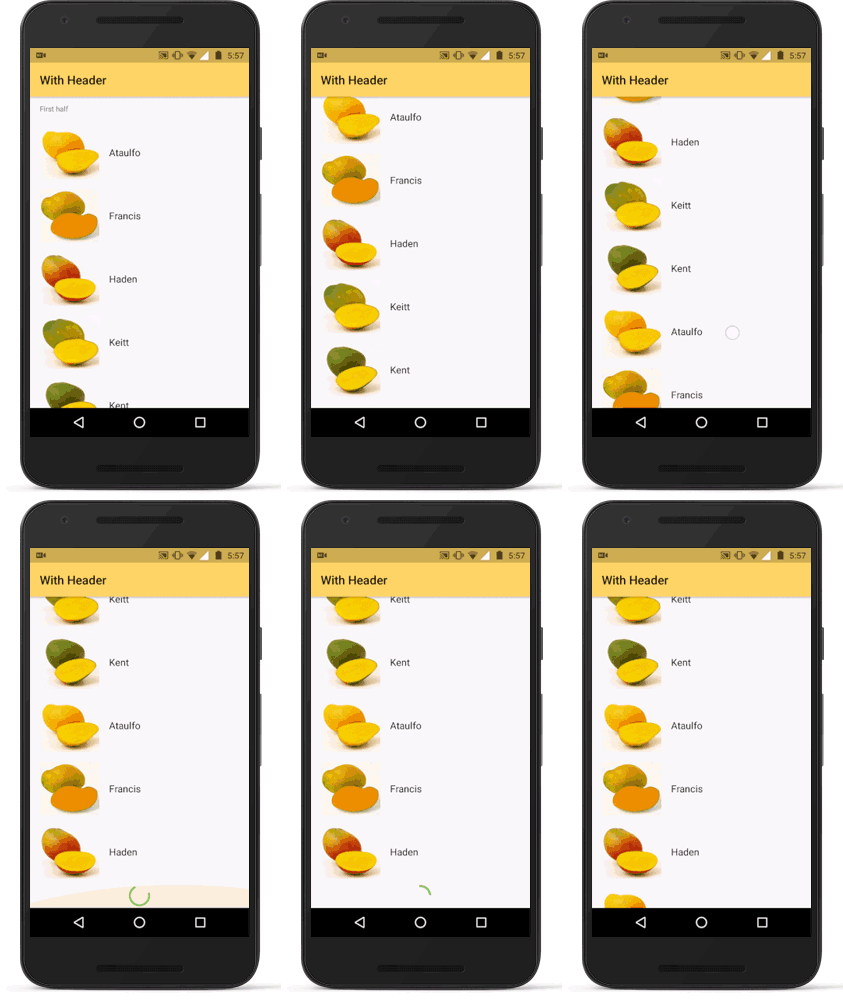
Pagination – Endless or infinite scrolling with FastAdapter
Alternatively, if you want to implement Pagination with a regular RecyclerView.Adapter, then read Android Pagination with RecyclerView.
Wrapping it up
Wow, I think this was the longest post ever! I applaud your patience and perseverance for getting to the end of this post.
RecyclerView’s magic resides in its Adapter. FastAdapter knows this and simplifies it. It is more than just a convenience library. If you do a lot of Adapter manipulations, then having FastAdapter in your arsenal is an absolute must!
RESOURCES:
- mikepenz/FastAdapter library on GitHub (library and samples)
SOURCE CODE:
Relevant code snippets of mine, for this post can be found on my GitHub Gist here.
FastAdapter let’s you do almost anything you would with an ordinary RecyclerView. Just, more easier and faster. I’m going to start using FastAdapter for my existing and future projects. What about you? Let me know in the comments below!


Hi Suleiman,
I want to build a calendar in list with recycler view ….
I don’t want to use TIME SQUARE LIB .So any idea how can i ?
Hi Poonam,
You will have to inflate a CalendarView in each of your RecyclerView’s ViewHolders. This example explains how to setup a single CalendarView including customisation: https://examples.javacodegeeks.com/android/core/widget/android-calendarview-example/
Should be a good starting point.
Can we do range selection in calendar view ?
I don’t think Android’s default CalendarView allows a range selection. You’ll have to use a custom implementation or a library.
Can we have your full code?
i have done something like that but using listview (never update to recycleview)
https://github.com/xanscale/LocalhostToolkit/tree/master/app/src/main/java/localhost/toolkit/widget
the main difference is that my adapter manage automatically different type using class name
i think will be usefull merge this codes
Hi there,
That’s great! I’m sure it would help the ListView fans out there. Though a readme file would help people understand your code. Thanks for sharing though!