
This tutorial is now updated for AndroidX!
Android Bottom Bar (Bottom Navigation View) was officially added in Design Support Library v25. Bottom Bar was first introduced in the Material Design guidelines.
Initially, it was met with some reception. People had polarizing opinions on it. Even I, was on the negative spectrum of thought.The fact that it had existed on iOS for so long, now felt like a poor rip-off for Android.
However, usability studies say that Bottom Navigation trumps the Navigation Drawer. That’s when I felt its introduction was actually, well thought of.
But irrespective of our opinions, Bottom Navigation is here to stay. It is now officially supported in Android’s Design Support Library, as of version 25.0.0.
Bottom Navigation Bar - Getting Started
Bottom navigation bars make it easy to explore and switch between top-level views in a single tap. – material.io
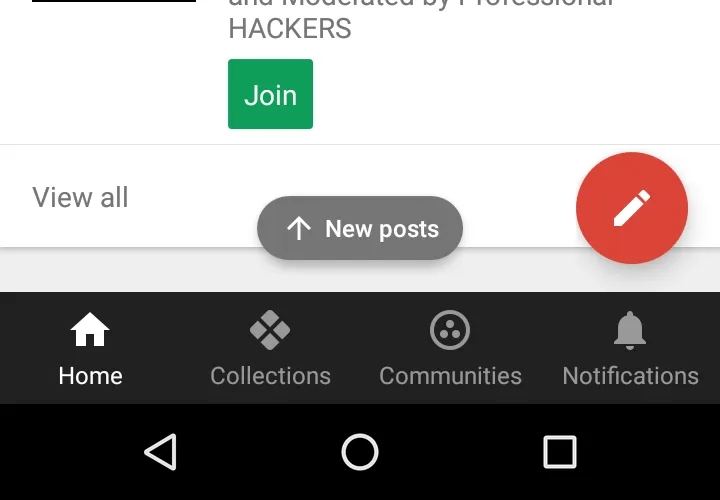
Bottom Navigation in Google+ app

Bottom Navigation in Instagram Android app
Some of you might wonder why I’m writing another post on Bottom Navigation.
When Bottom Navigation was added to the Material Design spec, there was no official support for it. This paved way for (unofficial) third-party libraries.
Now I’m not saying those libraries are bad in any way. Those who know me, will know that I encourage using third-party libraries when possible.
READ
Easy Bottom Navigation Tutorial with a custom library
The above article includes:
- Easy third-party implementation
- when to use Bottom Navigation and the difference with Navigation Drawer
- transition animations
However, if you want to use the official libraries (which are equally good, if not, better), read on below!
The Design Support Library is so popular, chances are that you’re already using it. Since it now includes BottomNavigationView, it might make little sense to rely on third-party.
Adding Dependencies
Start by adding the relevant support library dependencies.
dependencies { … implementation ‘androidx.appcompat:appcompat:1.1.0’ implementation ‘com.google.android.material:material:1.0.0’ // Other Dependencies }
Adding BottomNavigationView to Layout
Now, add the Bottom Bar to your layout.xml.
<com.google.android.material.bottomnavigation.BottomNavigationView android:layout_width=“match_parent” android:layout_height=“wrap_content” android:layout_gravity=“bottom” ** app:itemBackground=“?attr/colorPrimary” ** app:itemIconTint=“@drawable/selector_bottombar” app:itemTextColor=“@drawable/selector_bottombar” app:menu=“@menu/bottombar_menu”/>
I’ve taken the liberty to add some basic styling here. As you can see, we’re allowed to set a few basic color properties.
UX DESIGN TIP
Remember to keep your non-active tab items (icon+text) visible at all times so people know what they are, even when its not active.
Adding Bottom Navigation Items
Create a new bottombar_menu.xml under …res/menu/.
bottombar_menu.xml
NOTE
It is recommended to have at least 3, and at most 5 items in Bottom Navigation.
Connecting Bottom Navigation in Activity.java
Head over to your Activity.java. Initialize your UI.
public class BottomBarActivity extends AppCompatActivity {
private BottomNavigationView bottomNavigationView;
...

@Override
protected void onCreate(Bundle savedInstanceState) {
    super.onCreate(savedInstanceState);
    setContentView(R.layout.activity_bottom_bar);

    bottomNavigationView = findViewById(R.id.bottom_nav);

  ...
}
… }
Listen for Item clicks
We can listen and react to individual item clicks of Bottom Navigation. We do this using BottomNavigationView. setOnNavigationItemSelectedListener().
bottomNavigationView.setOnNavigationItemSelectedListener( new BottomNavigationView.OnNavigationItemSelectedListener() { @Override public boolean onNavigationItemSelected(@NonNull MenuItem item) { switch (item.getItemId()) { case R.id.action_bottombar_calls: // TODO return true; case R.id.action_bottombar_recents: // TODO return true; case R.id.action_bottombar_trips: // TODO return true; } return false; } });
Now we have a basic Bottom Navigation set up for our app. Why not run it and see how it looks?
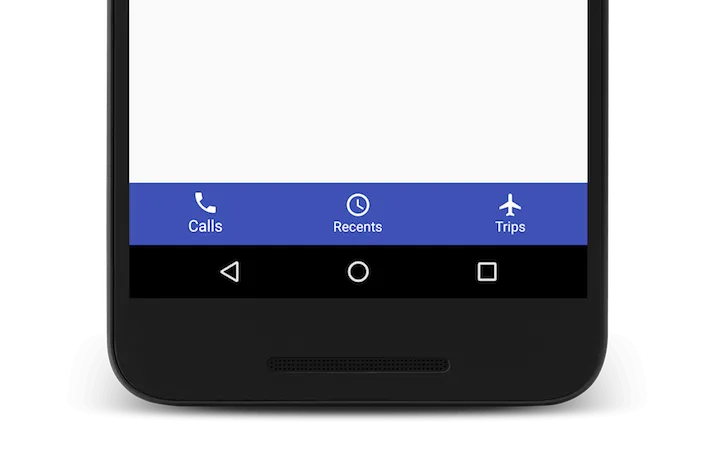
Our Bottom Navigation seems to register clicks. But something seems off. Did you notice?
Our very first navigation item ‘Calls’ is selected by default alright.
But something doesn’t seem right
I don’t know about you, but I don’t see any state difference.
Meaning, visually, there’s hardly any difference between items that are resting, and the active item. In short, there is not enough visual contrast to differentiate the two.
Take a good look at our Bottom Navigation. Now see how it looks like on the Material Docs.
Image credit - material.io
Surely both don’t look the same!
Something has to be done about that. We can quickly take care of this by using XML selectors.
Bottom Navigation Styling - Selector States
Going by our XML, our Bottom Nav’s background is colored. We want to light up our active item with 100% white and want the inactive ones dim. So let’s say the inactive tab items are at 40% white. Here is the XML selectors for the same.
Create selector_bottombar_item.xml under …res/drawable/.
Modify your Activity’s BottomNavigationView widget to use this selector.
…
<com.google.android.material.bottomnavigation.BottomNavigationView
android:id=”@+id/bottom_nav”
…
app:itemIconTint=“@drawable/selector_bottombar”
app:itemTextColor=“@drawable/selector_bottombar”
app:menu=“@menu/bottombar_menu”/>
…
Run your app again.

Much better right?
Before moving onto the next section, why don’t you take a breather?
Creating Screens for Bottom Navigation Items
If you recall the guidelines, BottomNavigationView navigates between top-level views.
Think carefully, the top-level view(s) here would be the visible space above the Bottom Navigation.
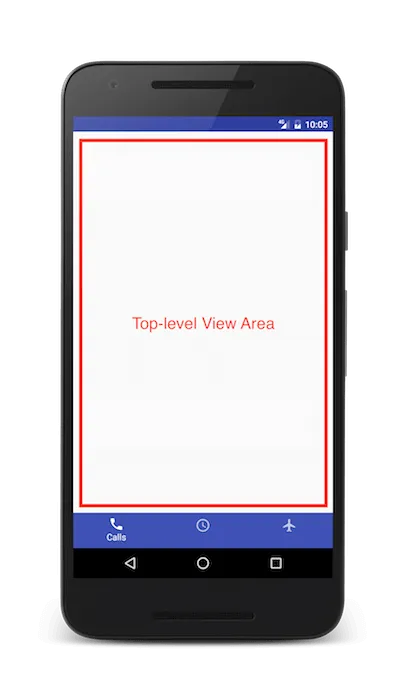
This visible space must reflect the currently active Bottom Navigation Item.
So if the ‘Calls’ item is currently active (highlighted or selected) in our Bottom Navigation, then the visible space must show the Calls screen.
We can do this using Fragment.
Let’s hook up our BottomNavigationView with some Fragments.
Creating Fragments
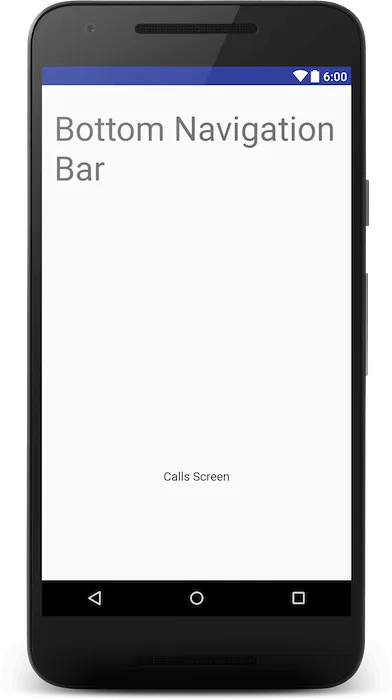
For simplicity, I will use a single Fragment, with slight UI changes that denote each navigation item.
Create class BottomBarFragment.java. The only thing that I’ll be doing here is include a TextView. It will reflect the name of the current Bottom Navigation item.
public class BottomBarFragment extends Fragment { public static final String ARG_TITLE = “arg_title”; private TextView textView;
...

@Override
public View onCreateView(LayoutInflater inflater, ViewGroup container,
                         Bundle savedInstanceState) {
    View rootView = inflater.inflate(R.layout.fragment_bottom_bar, container, false);

    textView =  rootView.findViewById(R.id.fragment_bottom_bar_text_activetab);

    String title = getArguments().getString(ARG_TITLE, "");
    textView.setText(title);
  ...
    return rootView;
}
}
Layout Design
Here’s what I’ve created. Something simple enough where the TextView denotes the current active navigation item.
fragment_bottom_bar.xml
Modifying Activity layout to support Fragments
Go back to your Activity’s XML layout. We need a FrameLayout that will host our Fragment.
<FrameLayout
    android:id="@+id/frame_fragmentholder"
    android:layout_width="match_parent"
    android:layout_height="match_parent"
    android:layout_marginBottom="?attr/actionBarSize"/>
<com.google.android.material.bottomnavigation.BottomNavigationView />
Inflating Fragments
Go back to BottomBarActivity.java. We need to do 2 things.
1. Build a list of our Fragments. One for each Navigation item
Declare a List<BottomBarFragment> of Fragments that will hold all the Fragments for our Bottom Navigation.
private List
We need a List of size 3 since our Bottom Navigation contains 3 items.
private void buildFragmentsList() { BottomBarFragment callsFragment = buildFragment(“Calls”); BottomBarFragment recentsFragment = buildFragment(“Recents”); BottomBarFragment tripsFragment = buildFragment(“Trips”);
    fragments.add(callsFragment);
    fragments.add(recentsFragment);
    fragments.add(tripsFragment);
}
Next, we’ll define the buildFragment() method. It’s job is to initialize each BottomBarFragment to hold the correct Bottom Navigation item title.
private BottomBarFragment buildFragment(String title) { BottomBarFragment fragment = new BottomBarFragment(); Bundle bundle = new Bundle(); bundle.putString(BottomBarFragment.ARG_TITLE, title); fragment.setArguments(bundle); return fragment; }
We now have a list of fragments that hold 3 BottomBarFragment. Each Fragment here holds its respective Bottom Navigation item title. The fragments in the List are in the same order as the Bottom Navigation items.
2. Inflate Fragment based on position
Lastly, we inflate the correct Fragment of the 3, into our FrameLayout.
Let’s write a generic method that handles the Fragment switching for us.
private void switchFragment(int pos, String tag) { getSupportFragmentManager() .beginTransaction() .replace(R.id.frame_fragmentholder, fragments.get(pos), tag) .commit(); }
There are 2 scenarios to handle:
a. App launch
We need to show a Fragment by default, when the app launches. This would obviously be the very first item in the Bottom Navigation, ‘Calls’ item.
Add this line in BottomBarActivity.onCreate().
// Set the 0th Fragment to be displayed by default. switchFragment(0, TAG_FRAGMENT_CALLS);
It would be wise to maintain constant tags to uniquely identify each Fragment (Bottom Navigation Item).
private static final String TAG_FRAGMENT_CALLS = “tag_frag_calls”; private static final String TAG_FRAGMENT_RECENTS = “tag_frag_recents”; private static final String TAG_FRAGMENT_TRIPS = “tag_frag_trips”;
b. Bottom Navigation item clicks
When a Bottom Navigation item is clicked, the view is changed. In relative terms, we show the relevant BottomBarFragment.
Modify your BottomNavigationView item click listener as follows.
bottomNavigationView.setOnNavigationItemSelectedListener( new BottomNavigationView.OnNavigationItemSelectedListener() { @Override public boolean onNavigationItemSelected(@NonNull MenuItem item) { switch (item.getItemId()) { case R.id.action_bottombar_calls: switchFragment(0, TAG_FRAGMENT_CALLS); return true; case R.id.action_bottombar_recents: switchFragment(1, TAG_FRAGMENT_RECENTS); return true; case R.id.action_bottombar_trips: switchFragment(2, TAG_FRAGMENT_TRIPS); return true; } return false; } });
Here’s the complete BottomBarActivity.java for your reference.
public class BottomBarActivity extends AppCompatActivity { private static final String TAG_FRAGMENT_CALLS = “tag_frag_calls”; private static final String TAG_FRAGMENT_RECENTS = “tag_frag_recents”; private static final String TAG_FRAGMENT_TRIPS = “tag_frag_trips”;
private BottomNavigationView bottomNavigationView;
/\*\*
 \* Maintains a list of Fragments for {@link BottomNavigationView}
 \*/
private List<BottomBarFragment> fragments = new ArrayList<>(3);

@Override
protected void onCreate(Bundle savedInstanceState) {
    super.onCreate(savedInstanceState);
    setContentView(R.layout.activity_bottom_bar);

    bottomNavigationView = (BottomNavigationView) findViewById(R.id.bottom_nav);

    bottomNavigationView.setOnNavigationItemSelectedListener(
            new BottomNavigationView.OnNavigationItemSelectedListener() {
                @Override
                public boolean onNavigationItemSelected(@NonNull MenuItem item) {
                    switch (item.getItemId()) {
                        case R.id.action_bottombar_calls:
                            switchFragment(0, TAG_FRAGMENT_CALLS);
                            return true;
                        case R.id.action_bottombar_recents:
                            switchFragment(1, TAG_FRAGMENT_RECENTS);
                            return true;
                        case R.id.action_bottombar_trips:
                            switchFragment(2, TAG_FRAGMENT_TRIPS);
                            return true;
                    }
                    return false;
                }
            });

    buildFragmentsList();

    // Set the 0th Fragment to be displayed by default.
    switchFragment(0, TAG_FRAGMENT_CALLS);

}

private void switchFragment(int pos, String tag) {
    getSupportFragmentManager()
            .beginTransaction()
            .replace(R.id.frame_fragmentholder, fragments.get(pos), tag)
            .commit();
}

private void buildFragmentsList() {
    BottomBarFragment callsFragment = buildFragment("Calls");
    BottomBarFragment recentsFragment = buildFragment("Recents");
    BottomBarFragment tripsFragment = buildFragment("Trips");

    fragments.add(callsFragment);
    fragments.add(recentsFragment);
    fragments.add(tripsFragment);
}

private BottomBarFragment buildFragment(String title) {
    BottomBarFragment fragment = new BottomBarFragment();
    Bundle bundle = new Bundle();
    bundle.putString(BottomBarFragment.ARG_TITLE, title);
    fragment.setArguments(bundle);
    return fragment;
}
}
Conclusion
Wow, that took longer than expected! Now with everything done, go ahead and run the app.
If your app looks similar to that, give yourselves a pat on the back.
Congratulations! We’ve successfully added Bottom Navigation to our apps.
Source Code:
Quick Recap
In this article, we set up a BottomNavigationView and reacted to item clicks. Then we looked into styling options with XML selectors. Finally, we saw how to set up navigation between Fragments using the Bottom Navigation Items.
Now all that’s left is for you to decide what content goes into each Fragment. I am sure you will create something great. Good luck with that!
Is there anything you’d like to add to this article? Let me know in the comments.
If you liked reading this article, share it to your social network.