Android O Tutorial: Supporting Picture-in-Picture (PIP)

Picture in Picture or PIP is a feature famously seen on YouTube and Android TV apps. It minimizes your content (typically video), keeping it pinned to a corner while you carry out your other tasks.
In other words, the video keeps playing in the corner, while you continue using the app.
What’s Picture-in-Picture?
Picture-in-picture mode lets apps run a video activity in the pinned window while another activity continues in the background. – developer.android.com
Let me rephrase that for you. Open YouTube and watch a video. You’ll notice you can minimize that video and continue to watch it whilst using the app.

PIP in YouTube app
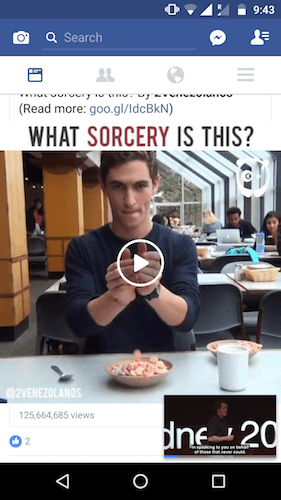
Recently, even Facebook added it. You can minimize a video and continue watching it, while you’re scrolling through your newsfeed. Sweet!

PIP in Facebook
Until now, to implement such a feature, Android Developers like you and I had two options:
- Write our own – won’t come off pretty
- DraggablePanel – works fine
Yep, I heard you. DraggablePanel was our only choice. While that was and is a fine library, I’d say there’s a better option today.
Picture in Picture with Android O
When Android Nougat came, we saw PIP support for Android TV. It was only a matter of time when it came to mobile. Finally, in the next version, Android O added support for mobile too!
In this article, I’ll tell you how to enable support for mobile. Developers who have worked on Android TV with Nougat should feel right at home. But don’t worry if you haven’t. You’ll be able to follow along just as easy.
Getting Started – Project Setup
To use all of Android O’s features properly, you need Android Studio 3.0 Preview. This works as a standalone install compared to your existing, stable Android Studio.
If you already have all of that setup, then feel free to go ahead with this tutorial.
If you haven’t setup Android Studio 3.0 Preview, I strongly recommend you go through the Android O: Getting Started article first. It covers how to setup Android Studio Preview to use API 26.
Anyways, for your reference, here’s what we’ll be using:
- Android Studio 3.0 Preview
- Gradle version – 3.0.0-alpha4
- compileSdkVersion – 26
- buildToolsVersion – 26.0.0
- Support Library Version – 26.0.0-beta2
You can use these to update your Gradle build accordingly.
Lastly, make sure you’re using Google’s maven repository. Open your project-level build.gradle file.
buildscript {
   repositories {
      google()
      jcenter()
   }
   dependencies {
      classpath 'com.android.tools.build:gradle:3.0.0-alpha4'
   }
}

allprojects {
   repositories {
      google()
      jcenter()
   }
}
// ...
Adding PIP Support on Android
First, we need to create an Activity and declare that it supports picture-in-picture. So go ahead and create a new Activity. I call mine PipActivity.java.
Next, open your AndroidManifest.xml. Here, we’ll declare that PipActivity supports Picture-in-Picture. We do so by using the supportsPictureInPicture attribute.
<activity
            android:name=".PipActivity"
            android:launchMode="singleTask"
            android:supportsPictureInPicture="true"
            android:theme="@style/AppTheme.NoActionBar" />
NOTE:
Developers who have worked with Android Nougat for TV might notice that the resizeableActivity attribute is no longer required for PIP. However, keep in mind that if you set resizeableActivity to false, then the supportsPictureInPicture attribute is ignored.
Handling Activity Duplication and Recreation
Notice the launchMode attribute in the Manifest. Any guesses why it’s required?
Avoiding Activity Duplication – Using Launch Modes
The Launch Mode singleTask tells Android that there should be only one instance of that Activity.
In other words, if I keep starting PipActivity, only one instance of it should open. There should never be any duplicates.
This scenario is highly likely and is mandatory that you handle it.
For example, take the YouTube app. You’re browsing through a playlist and you open a particular video. Then, if you enter PIP mode, you’re back to the playlist screen. Now, if you click the same video again, we want the existing video to enlarge back up. Or, if you click another video, we want PIP to maximize with the clicked video playing. We do not want another (PIP) screen to open.
The singleTask Launch Mode handles this for us.
Preventing Activity Recreation
If you’re that daring person who wants to support PIP and orientation changes, then you’ll need one extra attribute.
Add the configChanges attribute to your Manifest to prevent PipActivity from being recreated each time on orientation change.
This will be extremely handy when your PiP includes a player (which will most likely be the scenario).
Starting Picture-in-Picture mode
Now that we’ve prepared our Activity, the next step is to trigger PIP mode.
So to do that, we need to create a simple layout first. Open your Activity’s XML layout.
XML Layout
Honestly, I leave this to your imagination. But for the sake of this tutorial, I’m going to pretend we have a UI that includes a player.

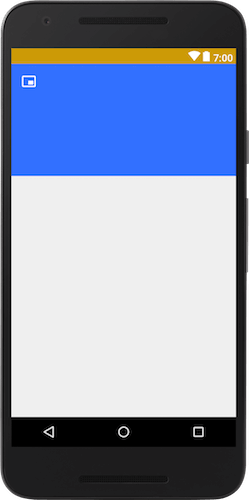
PIP XML layout
The layout is very simple. Here’s the XML code for the same.
<FrameLayout
    android:id="@+id/frame_mock_player"
    android:layout_width="match_parent"
    android:layout_height="@dimen/app_bar_height"
    android:background="@color/colorAccent">

    <ImageButton
        android:id="@+id/btn_minimize"
        android:layout_width="wrap_content"
        android:layout_height="wrap_content"
        android:layout_gravity="top|start"
        android:layout_margin="@dimen/layout_margin"
        android:background="?selectableItemBackgroundBorderless"
        android:src="@drawable/ic_picture_in_picture_alt_black_24dp"
        android:tint="@android:color/white" />

    <!--Other Player UI here-->
</FrameLayout>

<FrameLayout
    android:layout_width="match_parent"
    android:layout_height="match_parent"
    android:background="#EFEFEF">

    <!--Video details UI here-->

</FrameLayout>
In short, we have a FrameLayout that would be our player. We also have a button that indicates switching to Picture in Picture mode.
You can add that icon via a right click on res/drawable folder> New> Vector Asset. In this way, you can choose from the entire set of Google’s Material Design icons.
TIP:
These icons that you import are by default, black in color. So make sure to tint vector icons for pre-Lollipop devices.
Triggering PIP
With the layout complete, it’s now time to start Picture-in-Picture. So to do that, head over to PipActivity.
PiP is triggered when we click the button on the top-right. So we’ll write our entire logic inside that button’s click listener.
mBtnPip.setOnClickListener(view -> {
   if (android.os.Build.VERSION.SDK_INT >= 26) {
      //Trigger PiP mode
      try {
         Rational rational = new Rational(mFramePlayer.getWidth(),
                                         mFramePlayer.getHeight());

                PictureInPictureParams mParams =
                        new PictureInPictureParams.Builder()
                                .setAspectRatio(rational)
                                .build();

                enterPictureInPictureMode(mParams);
            } catch (IllegalStateException e) {
                e.printStackTrace();
            }
        } else {
            Toast.makeText(PipActivity.this, "API 26 needed to perform PiP", Toast.LENGTH_SHORT).show();
        }
    });
There are a couple of things going on here, so let’s tackle it one at a time.
If you’ve seen the PIP animation, notice that the ‘ratio’ the player maintains when maximized and minimized, are the same.
So it’s essential that we do the same. You can simply enter Picture-in-Picture mode using enterPictureInPictureMode(). But you can pass in some optional parameters if you wish. That’s what we’re doing here.
We will maintain the ratio of our dummy player to be the same in PIP mode. For that, we need to pass a PictureInPictureParams object.
NOTE:
I’m triggering PIP mode only for API 26 and above. Ideally, as a fallback, you must hide or disable this feature. For the sake of this tutorial, I’m displaying a Toast message.
Best Practices
Now that we’ve seen how to launch PIP, there are a couple of things to keep in mind.
Adapting UI to PIP mode
When in PIP mode, avoid displaying any UI controls except the video player.
When PipActivity enters PIP mode, we need to hide everything displayed except the video. So to do that, we need some way to know that we’re currently in PIP.
We can detect when an Activity enters Picture-in-Picture using the onPictureInPictureModeChanged() method.
In our case, the only UI control we need to hide is the PIP ImageButton on the top-left.
@Override
    public void onPictureInPictureModeChanged(boolean isInPictureInPictureMode) {
        super.onPictureInPictureModeChanged(isInPictureInPictureMode);
        if (!isInPictureInPictureMode) {
            mBtnPip.setVisibility(View.VISIBLE);
        } else {
            mBtnPip.setVisibility(View.GONE);
        }
    }
TIP:
You can override onPictureInPictureModeChanged() either in your Activity or Fragment.
Updating PIP Content
Remember we discussed the importance of singleTask Launch Mode to avoid duplicate PIPs? I even used the YouTube app as an example.
If you think carefully about that example, there’s one thing that we don’t know how to handle. When we’re in PIP, and we click on another content, we solved the duplication problem. But PIP must be updated with the content that we clicked. How can we do that?
Use the onNewIntent() method to update your PIP with the new content data.
Managing Playback
Once our Activity goes into PIP mode, we need to ensure that the content playback continues.
NOTE:
When you switch to PIP mode, Android considers that Activity to be in a paused state. Hence it calls that Activity’s onPause() method.
Forget PIP for a second. If your Activity goes into onPause(), then ideally, you’ll pause your playback too. But if you’re in PIP mode, make sure you don’t pause playback.
Android’s given us a handy method isInPictureInPictureMode() that we can use to handle this.
@Override
protected void onPause() {
    super.onPause();

    if (Build.VERSION.SDK_INT >= Build.VERSION_CODES.N
            && isInPictureInPictureMode()) {
        // Continue playback...
    }
    // Not in PIP & Activity is paused. Pause playback if required....
}
Output
Finally, we’ve done everything that’s needed to make Picture in Picture work. We’ve also made sure to handle its common scenarios. Let’s see how it works.
Make sure you create an Android Emulator (AVD) that runs API 26 (Google Play System Image). Once you’ve done that, run your app. You should get a working PIP like this.

Wrap up
Picture-in-Picture was finally brought to Android Smartphones thanks to Android O. In this article, we briefly saw how to prepare Android Studio to use the latest Android O SDK (API 26). Then we learnt how to use PIP.
Although PIP is generally used for video playing content, this tutorial excluded a guide for video playing. This was done to ensure the focus stays on Picture in Picture.
SOURCE CODE:
Sample working Project available on GitHub.
Where to from here?
Remember, there is no hard and fast rule that PIP must only be used for video playing content. Its usage is only restricted to your imagination.
How will you use PIP in your app? Have any questions? Let me know in the comments below.
Lastly, if you liked reading this, don’t forget to share (on the left). If you want updates on the next article, subscribe below.


I can see jerk while entering from normal player to PIP mode even with google PIP example. Could u help me out on this? Animation from normal player to PIP mode, should be smooth.
thanx for sharing
Very helpful thanx
I can use PIP to stream data, right? Can I customize it for different users?